 Get Palette Grid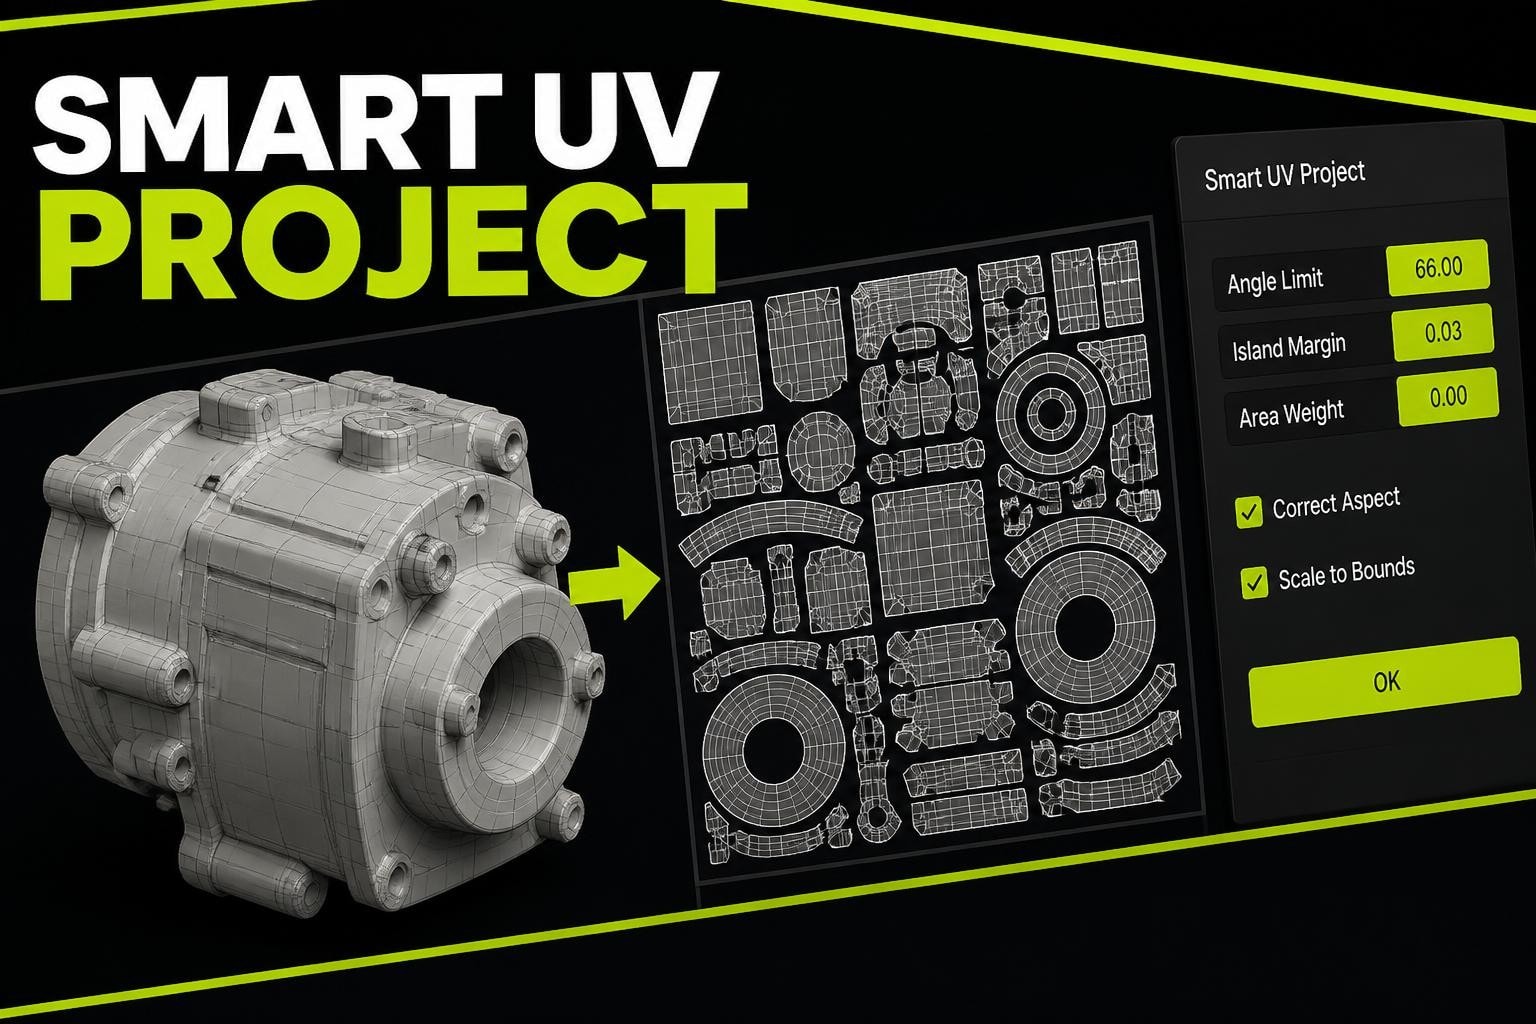
UV mapping remains one of the most critical yet time-consuming stages in 3D asset creation. Whether you're preparing game-ready models or setting up textures for stylized characters, the quality of your UV layout directly impacts texture clarity, file size, and rendering performance. Blender's Smart UV Project offers an automated solution that analyzes mesh geometry and generates UV layouts without manual seam placement. This tool has become essential for artists working under tight deadlines, particularly when handling complex organic shapes or hard-surface models that would otherwise require hours of manual unwrapping. Understanding how to leverage blender smart uv project effectively can transform your texturing workflow from tedious to efficient.
Understanding Smart UV Project Fundamentals
The blender smart uv project function operates on a projection-based algorithm that examines your mesh from multiple angles and automatically determines optimal UV islands. Unlike manual unwrapping where you mark seams and unwrap selected faces, Smart UV Project calculates these divisions based on surface angle changes and geometric discontinuities.
This automated approach works by casting virtual cameras at your model from various viewpoints. Each face gets assigned to the camera that views it most directly, minimizing distortion. The algorithm then creates UV islands based on these projections, with island boundaries forming where viewing angles change dramatically.
Key Parameters Explained
Smart UV Project includes several critical settings that control output quality:
- Angle Limit: Determines how sharp an angle must be before the algorithm creates a new UV island
- Island Margin: Sets spacing between UV islands to prevent texture bleeding
- Area Weight: Influences how the algorithm balances island sizes
- Correct Aspect: Maintains proportional scaling in the UV space
- Scale to Bounds: Automatically fits all islands within the 0-1 UV space
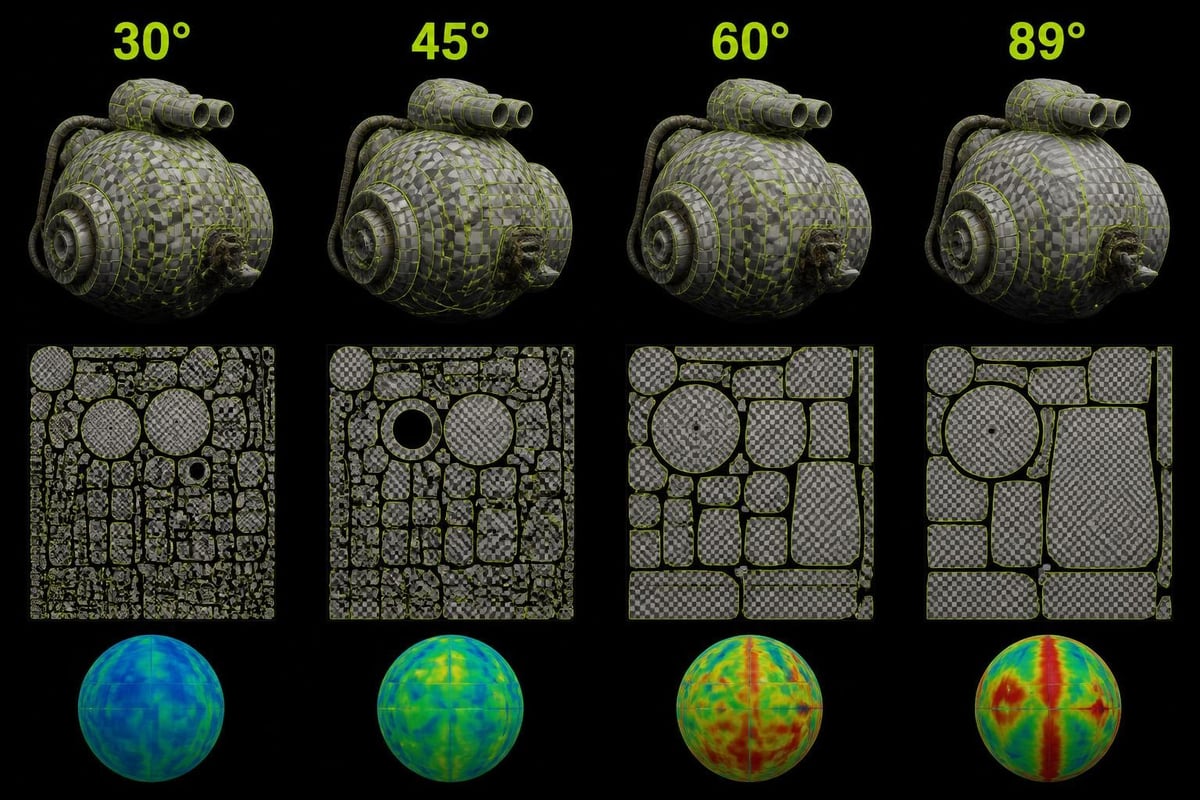
The angle limit parameter deserves special attention. Lower values (30-45 degrees) create more islands with less distortion but require more texture space and seams. Higher values (60-89 degrees) produce fewer islands but may introduce stretching on curved surfaces.
Optimal Workflows for Different Asset Types
Different model types benefit from tailored blender smart uv project approaches. The tool's flexibility makes it suitable for various production scenarios, but understanding which settings work best for each case saves iteration time.
Hard Surface Models
Hard surface assets like weapons, vehicles, and architecture typically feature clear geometric divisions. Smart UV Project excels here because angular transitions naturally align with where you'd place manual seams.
For mechanical objects, use these settings:
- Set angle limit between 65-75 degrees
- Enable correct aspect to maintain proportions
- Increase island margin to 0.02-0.03 for baking clearance
- Apply edge split modifier before unwrapping to handle sharp edges
This combination respects existing sharp edges while creating clean, organized UV layouts. The higher angle threshold prevents over-segmentation on beveled corners while still separating distinct surfaces.
Organic and Character Models
Organic meshes present more challenges because smooth surfaces lack obvious seam locations. While manual UV unwrapping techniques often work better for characters requiring minimal visible seams, blender smart uv project serves effectively for background assets or stylized models where seam visibility matters less.
| Model Type | Angle Limit | Island Margin | Best Use Case |
|---|---|---|---|
| Hard Surface | 65-75° | 0.02-0.03 | Weapons, vehicles, props |
| Stylized Characters | 50-60° | 0.01-0.015 | Low-poly game characters |
| Environment Props | 55-70° | 0.02-0.025 | Rocks, trees, buildings |
| Modular Assets | 70-80° | 0.03-0.04 | Kitbash pieces, tileable elements |
For stylized work where you plan to use palette textures or gradient mapping, Smart UV Project becomes even more valuable. These texturing approaches often hide seams naturally through color transitions.
Advanced Techniques and Modifier Integration
The blender smart uv project operator integrates seamlessly with Blender's modifier stack, enabling non-destructive workflows. Understanding this integration unlocks powerful procedural texturing possibilities.
Combining with UV Project Modifier
While Smart UV Project generates initial layouts, the UV Project Modifier offers dynamic projection for specific use cases. Use Smart UV Project for the base unwrap, then apply UV Project Modifier for decals or secondary details that need precise camera-based projection.
This hybrid approach works exceptionally well for:
- Environmental storytelling elements (posters, signs, graffiti)
- Weathering and damage overlays on primary textures
- Dynamic shadows or lighting effects baked as textures
Multi-Material Workflow
When working with models using multiple materials, Smart UV Project treats each material as a separate unwrap operation if you select specific faces. This selective approach helps maintain distinct UV layouts for different surface types.
Process for multi-material unwrapping:
- Select all faces assigned to material one
- Apply blender smart uv project with appropriate settings
- Select faces for material two without deselecting previous UVs
- Run Smart UV Project again with adjusted parameters
- Verify island spacing in UV Editor
This method proves particularly useful for game assets requiring different texture resolutions per material slot. You can pack high-detail surfaces tighter while giving simpler surfaces more UV space efficiency.
Optimizing for Game Development Pipelines
Game development demands specific UV considerations that affect performance, memory usage, and visual quality. The blender smart uv project tool aligns well with game production needs when configured properly.
Texture Atlas Considerations
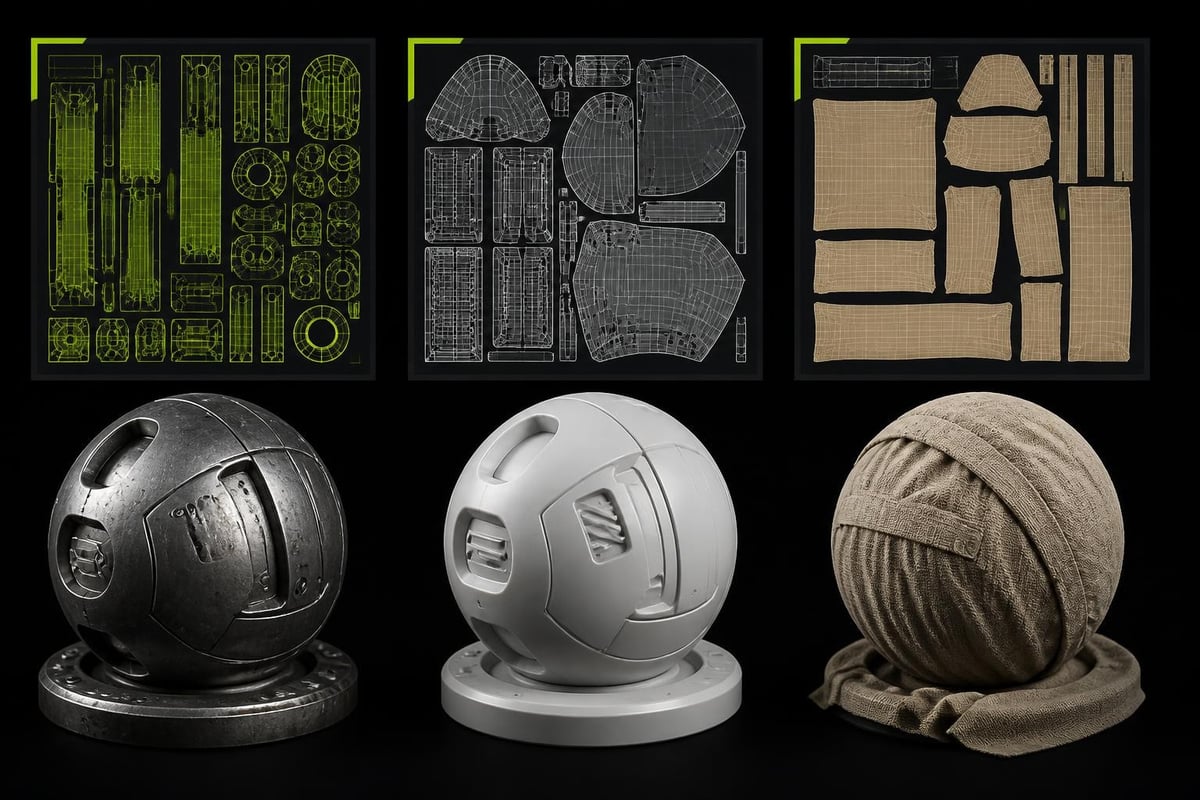
Modern game engines benefit from consolidated texture atlases that reduce draw calls. When preparing assets for palette texture workflows or texture atlases, Smart UV Project's automatic island generation speeds up the initial layout phase significantly.
After running Smart UV Project, use Blender's UV packing tools to optimize island arrangement. The average island utilization should target 75-85% of available UV space, leaving enough margin for mipmapping and texture filtering.
LOD and Mobile Optimization
Level-of-detail models require different UV strategies. Higher LOD meshes benefit from tighter angle limits (45-55 degrees) that preserve detail, while lower LODs can use aggressive settings (75-85 degrees) that minimize island count and texture lookups.
For mobile platforms where texture memory remains constrained:
- Use 70-80 degree angle limits to minimize seams
- Increase island margins to 0.025-0.035 for safe mipmapping
- Enable scale to bounds for maximum UV space usage
- Consider reducing draw calls through texture consolidation
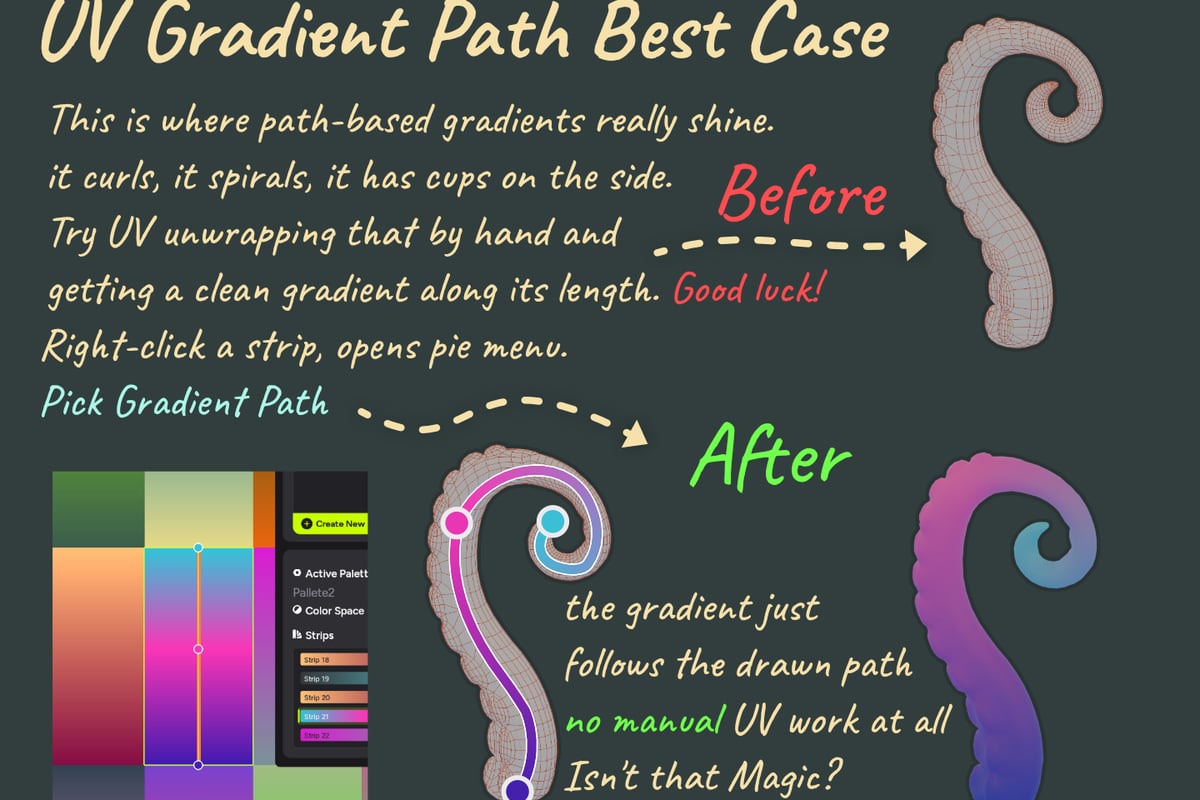
If you're building stylized game assets that use gradient-based texturing, the Palette Grid addon streamlines the process after UV unwrapping. It lets you create and edit palette textures directly in Blender without external tools, making it easier to iterate on color schemes while your UV layout remains stable.
Common Pitfalls and Solutions
Even experienced artists encounter issues when using blender smart uv project. Recognizing these problems early prevents wasted time and texture budget.
Distortion and Stretching
Excessive distortion typically stems from angle limits set too high for curved surfaces. The algorithm tries to fit curved geometry into flat UV space, creating visible stretching in textured results.
Diagnosis method: Enable the UV stretch display in the UV Editor's overlay settings. Blue areas indicate minimal distortion, while red areas show problematic stretching exceeding 10-15%.
Solutions include:
- Lowering angle limit by 10-15 degrees
- Manually marking seams on high-curvature areas before unwrapping
- Using conformal unwrap on problematic islands after initial projection
- Applying subdivision surface modifier before unwrapping organic shapes
Overlapping Islands
Island overlap occurs when the scale to bounds option packs multiple projection results into the same UV space. This prevents proper texturing and causes obvious visual errors.
Check for overlaps using the UV Editor's select overlap function (Select > Overlap). When detected, manually scale and reposition affected islands or re-run Smart UV Project on those faces with adjusted parameters.
Inefficient UV Space Usage
Poor space utilization wastes texture resolution and memory. After running blender smart uv project, evaluate the UV density across your model. Tools like the documentation resources often provide guidance on maintaining consistent texel density.
| Issue | Cause | Solution |
|---|---|---|
| Too many small islands | Angle limit too low | Increase to 60-70° |
| Excessive empty space | No packing after unwrap | Use Pack Islands operator |
| Inconsistent texel density | Mixed geometry scales | Apply scale before unwrapping |
| Bleeding between islands | Insufficient margin | Set island margin to 0.02+ |
Integration with Modern Texturing Workflows
Contemporary 3D pipelines increasingly rely on procedural and layer-based texturing tools. Understanding how blender smart uv project fits into these workflows maximizes its utility.
Substance Painter and External Tools
When exporting models to Substance Painter or similar applications, UV layout quality determines painting precision and bake success. Smart UV Project creates acceptable starting points, though you may need manual refinement for hero assets.
Before export:
- Run Smart UV Project with conservative settings
- Manually combine small adjacent islands where logical
- Straighten important edges that need precise texture alignment
- Verify no overlapping UVs exist
- Pack islands one final time for optimal density
The research on advanced UV mapping techniques demonstrates that aligned UV maps improve texture painting workflows significantly. While Smart UV Project doesn't guarantee perfect alignment, its projection-based approach creates more predictable layouts than completely random unwrapping.
Procedural Texturing in Blender
Shader nodes in Blender's material system often rely on UV coordinates for texture projection. The blender smart uv project output works seamlessly with these procedural setups, especially when combined with UV mapping nodes for additional control.
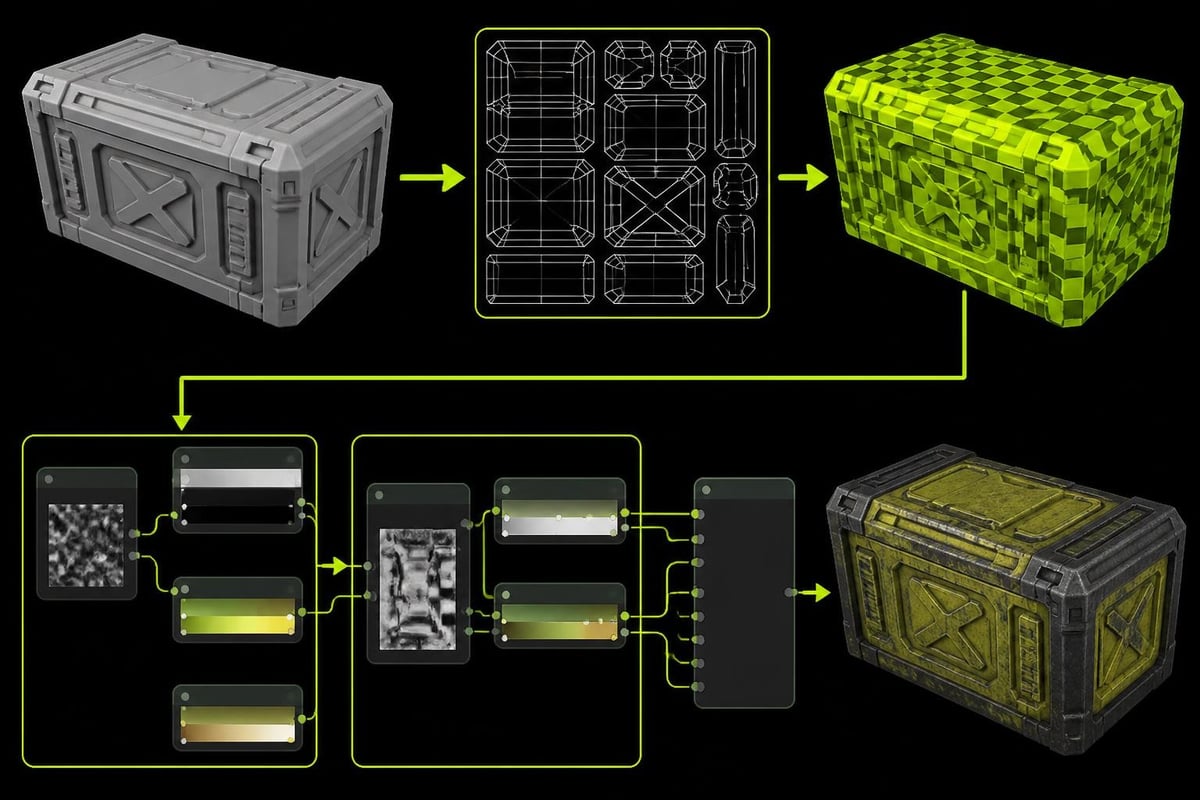
For stylized workflows using gradient-based coloring, having clean UV layouts from Smart UV Project ensures predictable results when applying procedural gradients. This approach pairs well with gradient mapping techniques that transform grayscale values into color ramps.
Performance Considerations and Best Practices
Computational efficiency matters when working with dense meshes or batch processing multiple assets. The blender smart uv project algorithm's performance scales with polygon count and setting complexity.
Mesh Preparation Tips
Clean geometry yields better UV results and faster processing:
- Remove duplicate vertices before unwrapping
- Delete unnecessary internal faces on solid objects
- Merge vertices by distance to eliminate microscopic gaps
- Apply modifiers that affect geometry (mirror, array, bevel)
- Check for non-manifold edges that confuse the algorithm
For massive meshes exceeding 100,000 polygons, consider unwrapping in sections. Select logical groups (arms, legs, torso for characters), unwrap separately, then combine UV islands afterward. This segmented approach maintains artist control while benefiting from Smart UV Project's speed.
Batch Processing Scripts
Python scripting enables automated blender smart uv project application across multiple objects. This proves invaluable for environment artists managing hundreds of props or technical artists building asset libraries.
A basic batch unwrap script iterates through selected objects, applies consistent Smart UV Project settings, and packs results. While beyond this article's scope, such automation workflows integrate well with studio pipelines building low-poly game assets efficiently.
Comparing Alternative Unwrapping Methods
Smart UV Project represents one approach among several UV mapping strategies. Understanding alternatives helps you choose the right tool for each situation.
Manual unwrapping offers maximum control but requires significant time investment. Artists mark seams strategically, then unwrap selected faces using angle-based or conformal methods. This approach works best for hero assets, characters, and any model where seam placement critically affects visual quality.
Cube projection and other primitive-based unwrapping methods suit simple geometric shapes but fail on complex organic models. These quick methods serve well for placeholder UVs during blocking stages.
Automatic unwrapping solutions like those detailed in Smart UV Project tutorials balance speed and quality. The blender smart uv project specifically excels at this balance, making it ideal for production environments where iteration speed matters.
The upcoming RetopoSketch addon from SavedPixel demonstrates how specialized tools can accelerate specific workflow stages. Similarly, Smart UV Project serves as a specialized solution for rapid UV layout generation, fitting naturally into broader production pipelines.
When Smart UV Project Works Best
Optimal use cases include:
- Background and environment props requiring quick turnaround
- Modular architecture systems with repetitive elements
- Prototype models during pre-production and blocking
- Stylized assets where some seam visibility is acceptable
- Base UV layouts that receive manual refinement afterward
Situations requiring alternatives:
- Character faces and hands needing invisible seams
- Organic creatures with smooth, continuous surfaces
- Assets destined for extreme close-ups in cinematics
- Models requiring specific UV alignment for tileable textures
Real-World Production Scenarios
Understanding theory matters, but practical application in production contexts reveals the true value of blender smart uv project workflows. Different studio types and project scales demand varied approaches.
Indie Game Development
Small teams benefit immensely from Smart UV Project's time savings. When building entire game worlds with limited artist resources, spending hours on perfect UVs for every asset becomes impractical. The tool enables rapid asset creation pipelines where models move from sculpting to textured in minutes rather than hours.
Combined with palette-based texturing approaches, indie developers can maintain consistent art styles while maximizing productivity. Smart UV Project handles unwrapping, palette textures handle coloring, and the result meets quality standards for stylized games.
Asset Marketplace Creation
Artists creating marketplace assets face unique challenges: models must work for diverse use cases and customer skill levels. Providing clean, logical UV layouts increases asset value and customer satisfaction.
Running blender smart uv project with moderate settings (55-65 degree angle limits) creates accessible UVs that most users can understand and modify. Include multiple UV channels if supporting both tiling textures and baked details, using Smart UV Project for the base channel and manual unwrapping for secondary detail channels.
Educational and Training Content
Instructors teaching 3D modeling benefit from Smart UV Project's consistency. Students can follow identical workflows and achieve similar results regardless of manual unwrapping skill levels. This standardization helps beginners focus on modeling fundamentals before advancing to complex UV techniques.
The comprehensive UV mapping guides often recommend Smart UV Project as an entry point, gradually introducing manual techniques as students progress. This pedagogical approach builds confidence while establishing good workflow habits.
Future-Proofing Your UV Workflows
As rendering technology and game engines evolve, UV mapping requirements shift. Staying current with best practices ensures your assets remain relevant and performant.
Virtual Texturing and Streaming
Modern engines increasingly support virtual texturing systems that stream texture data on-demand. These systems reduce memory pressure but require specific UV considerations. The blender smart uv project tool creates layouts compatible with virtual texturing, though you should verify no UV shells exceed the virtual page size limits (typically 128x128 or 256x256 pixels depending on implementation).
Real-Time Ray Tracing
Ray-traced rendering changes how texture detail and UV density affect visual quality. While traditional rasterization heavily penalized UV stretching, ray tracing's improved filtering somewhat masks these issues. However, maintaining good UV practices through proper Smart UV Project usage ensures assets perform well across both rendering paradigms.
Machine Learning and Automated Workflows
Research continues into AI-assisted UV generation that learns optimal unwrapping from training data. While these systems aren't yet mainstream in production tools, the principles behind blender smart uv project's angle-based analysis align with how neural networks evaluate mesh topology. Understanding current automated tools prepares you for next-generation solutions.
The broader Blender addon ecosystem continues expanding with specialized solutions for different workflow stages. Smart UV Project remains relevant by solving the specific problem of initial UV layout generation, integrating smoothly with these expanding tool chains.
Technical Deep Dive: Algorithm Behavior
For technical artists and pipeline developers, understanding how the blender smart uv project algorithm makes decisions enables better parameter tuning and troubleshooting.
The projection algorithm fundamentally operates through viewpoint sampling. It generates virtual camera positions around your mesh, typically using a geodesic distribution for even coverage. Each face's normal vector gets compared against these camera directions, with faces assigned to the camera they most directly face.
Angle limit threshold determines island boundaries by measuring dihedral angles between adjacent faces. When this angle exceeds your specified limit, the algorithm creates an island boundary. This explains why lower values produce more islands: more face pairs exceed the threshold.
Area weighting influences how the algorithm balances island sizes during packing. Higher area weights prioritize keeping large surfaces contiguous, potentially fragmenting smaller details. Lower weights distribute area more evenly across islands.
Understanding these mechanics helps diagnose unexpected results. If Smart UV Project creates surprisingly few islands, your angle limit likely exceeds your mesh's actual angular variations. If islands seem randomly fragmented despite smooth geometry, check for inconsistent face normals that create artificial angle discontinuities.
Mastering the blender smart uv project workflow transforms UV unwrapping from a tedious bottleneck into an efficient production step. Whether you're building game assets under deadline pressure or establishing baseline UVs for further refinement, understanding these automated tools accelerates your 3D workflow. At Saved Pixel, we build addons that solve real production problems like these, helping artists work faster without sacrificing quality. Our tools integrate seamlessly with workflows like Smart UV Project, letting you focus on creativity rather than technical obstacles.