Tutorial · · 12 min read · By Rayen Bahri, Saved Pixel
Gradient Texturing in Blender: The Complete Guide
TL;DR: Gradient texturing maps the UVs of a low-poly model onto a tiny palette texture made of flat colors and gradient strips. One 64 to 256 px texture can shade an entire scene, which means one material, minimal texture memory, and very fast iteration. The technique is free and works in any engine. The bottleneck has always been the manual setup: building palettes in an image editor and hand-placing UV islands. That part can now be automated inside Blender.
What is gradient texturing?
Gradient texturing (sometimes called palette texturing or gradient mapping) is a stylized texturing technique where you don't paint a unique texture for each asset. Instead, you build one small palette texture, a grid of flat color blocks and gradient strips, and you texture models by moving their UV islands onto the right part of that palette.
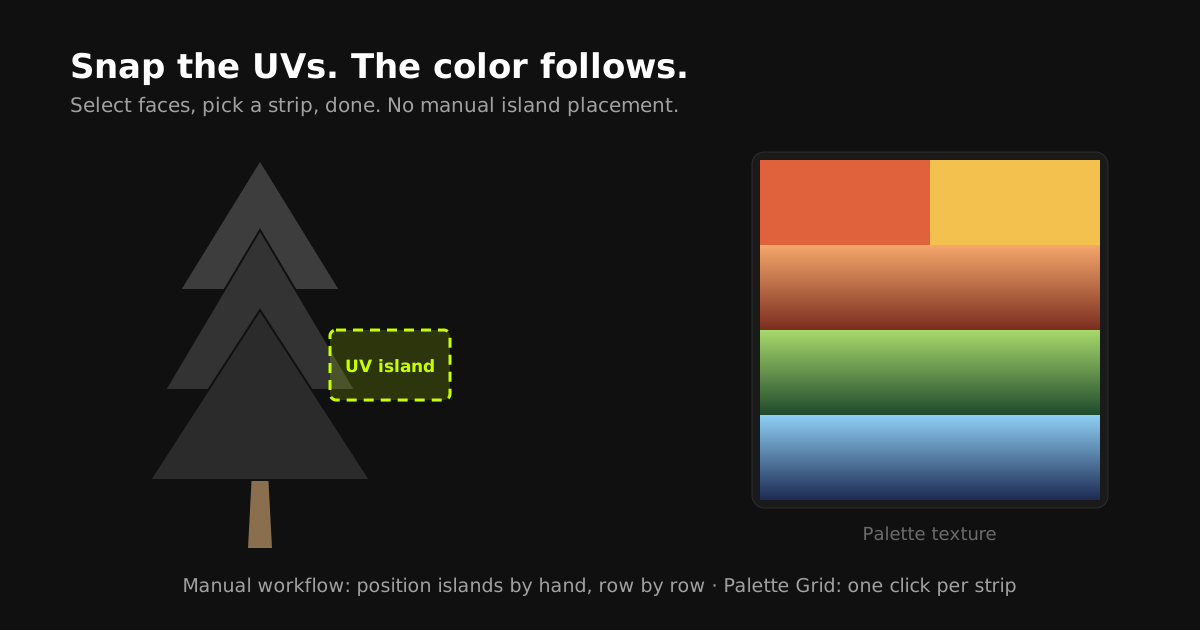
Want a face to be a solid warm red? Scale its UVs down to a point and drop them on the red block. Want a tree trunk to fade from dark roots to warm highlights? Stretch its UVs vertically across a brown-to-orange gradient strip. The gradient does the shading work that hand-painted texture detail or expensive lighting would normally do.
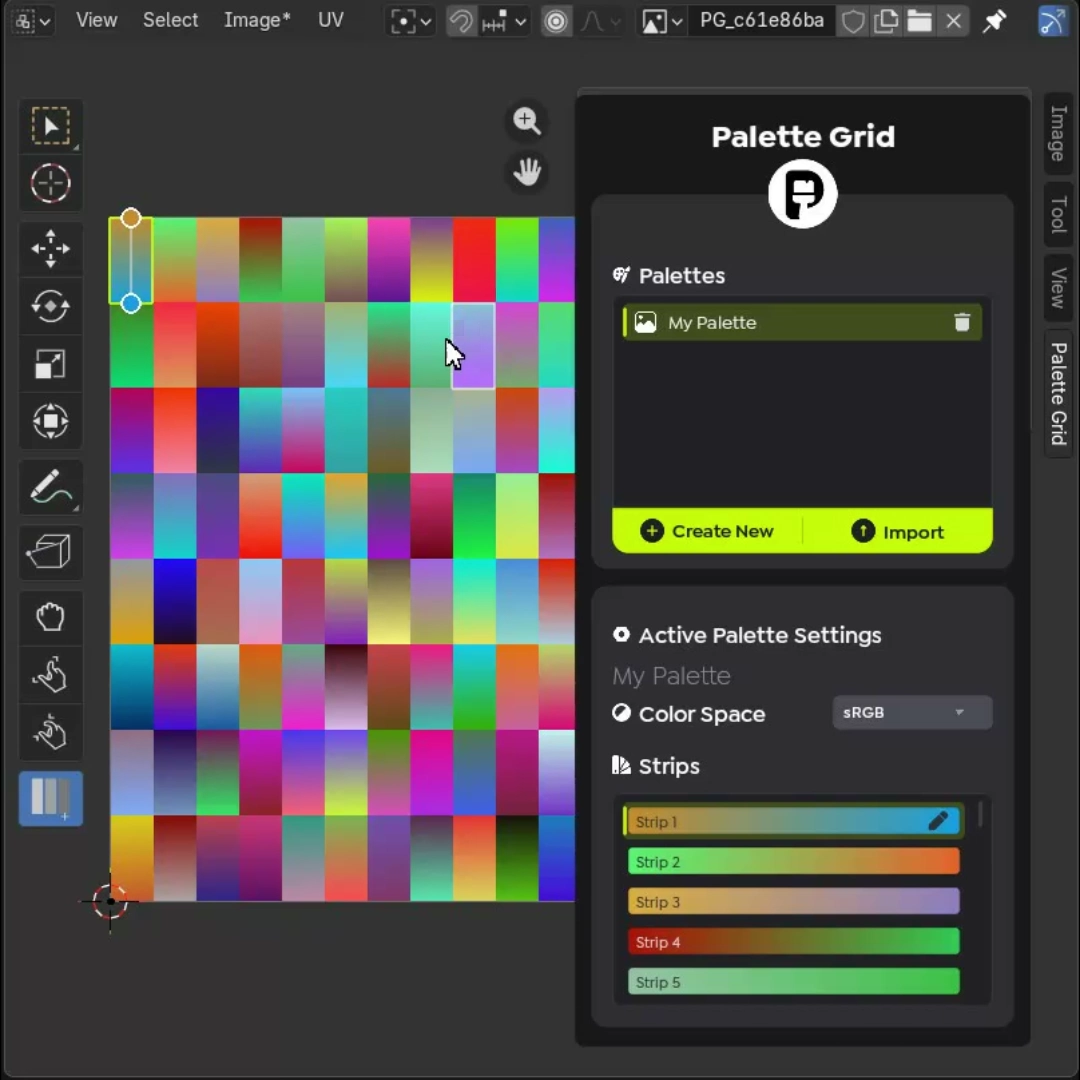
You have probably seen the result without knowing the name: most of the clean, colorful low-poly art on ArtStation, the visual style of games like Monument Valley or countless stylized mobile and indie titles, and a large share of the low-poly asset packs on itch.io and the Unity Asset Store are built exactly this way.
Why the technique is so efficient
- Tiny memory footprint. A 128x128 palette holds about 85 KB of uncompressed pixel data. A single 2048x2048 PBR set (albedo, normal, roughness) is measured in tens of megabytes. One palette can replace dozens of those sets, which matters enormously on mobile and Quest-class hardware.
- One material for everything. Every asset samples the same image, so an entire environment can share a single material. Fewer materials means fewer draw calls and better batching. (We break down the actual numbers in our draw call and texture memory guide.)
- Recolor in seconds. Change a color on the palette and every asset using that strip updates. Seasonal variants, team colors, and biome swaps become palette edits, not re-texturing jobs.
- No texture painting skill required. The look comes from color choice and UV placement, not brushwork. That makes it one of the most accessible ways to produce professional-looking 3D art.
The manual workflow, step by step
Everything below works in vanilla Blender with any image editor. This is the classic workflow the technique became known for.
1. Build the palette texture
In Photoshop, Krita, or GIMP, create a small square image. Anything from 64x64 to 256x256 is typical. Divide it into horizontal rows. Fill some rows with flat colors and paint vertical gradients into others. The usual convention is dark at the bottom and light at the top, so "up" in UV space always means "lighter". Export as PNG with no compression artifacts.
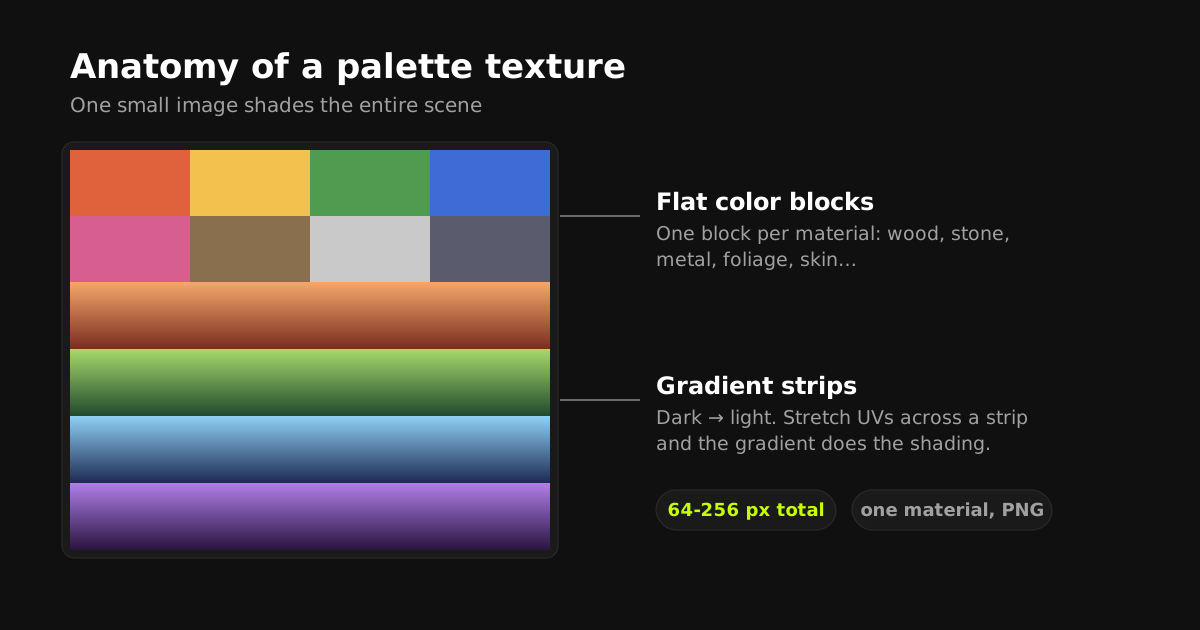
Decide your row layout before you texture anything, and write it down. Row 1 wood, row 2 stone, row 3 foliage, and so on. Every asset you texture afterwards depends on rows staying where they are, so treat the layout like an API: add rows at the bottom, never reshuffle existing ones.
2. Import and set up the material
In Blender, create one material with an Image Texture node pointing at your palette, plugged into a Principled BSDF (or straight into the output for a pure unlit look). Two node settings matter more than people expect:
- Interpolation: keep Linear for smooth gradient sampling. Switch to Closest only if your style uses hard flat blocks exclusively.
- Color space: the palette is color data, so leave it on sRGB. If colors look washed out in the viewport, check that the image node was not accidentally set to Non-Color.
3. Unwrap and place UV islands
This is where the actual "texturing" happens, and where the time goes. For each part of the model:
- Select the faces that should share a color or gradient.
- Unwrap them (a basic unwrap or project-from-view is fine; the island shape barely matters for flat colors).
- In the UV editor, scale and move the island so it sits inside the correct row of the palette.
- For gradients, rotate and stretch the island so the gradient runs the direction you want across the geometry.
4. Iterate
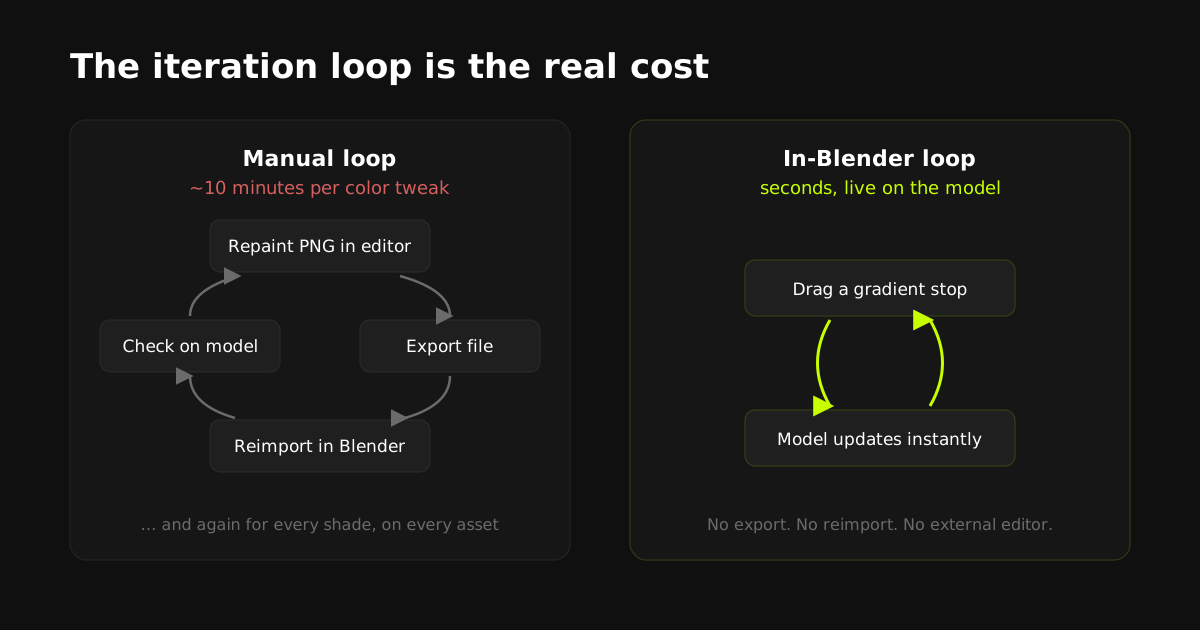
When a color feels wrong, you go back to your image editor, repaint the row, re-export, and reload the image in Blender. Then check it on the model, and repeat.
Where the manual workflow falls apart
The technique is genuinely simple. The workflow is death by a thousand cuts:
- Every color tweak is an export and reimport round trip through an external editor.
- UV islands are placed by eye, row by row. On a hero asset with dozens of material zones this takes longer than modeling the asset did.
- Gradient direction on curved or organic geometry means manually rotating islands until it looks right from the camera.
- Reusing a palette across a team or a project means documenting which row is which by convention and hoping everyone lines things up consistently.
A single color variation that should take seconds routinely takes ten minutes. Multiply by every asset in a scene and the "fast" technique stops being fast.
The automated workflow: palette texturing inside Blender
All four steps above can happen inside Blender itself. Palette Grid is a Blender addon built specifically for this workflow. We build it, so take the enthusiasm with that in mind, but the workflow difference is objective:
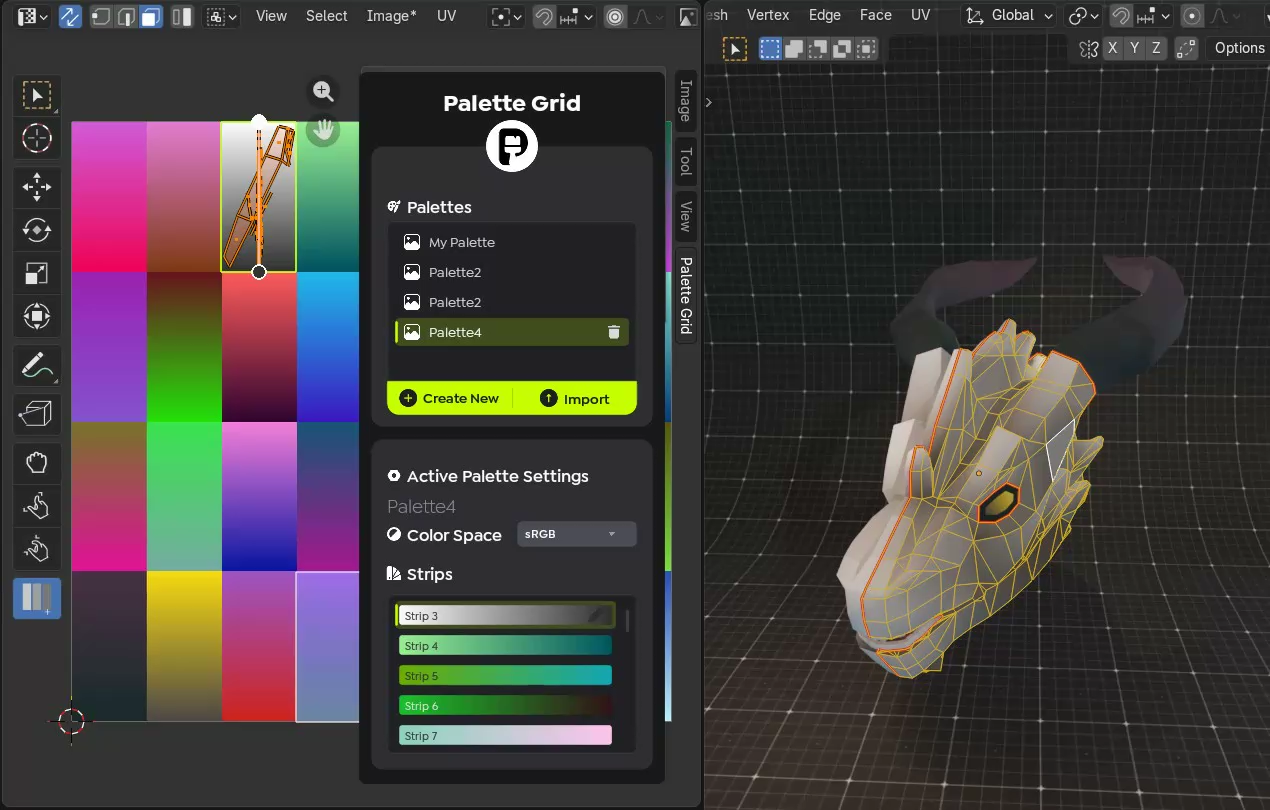
- Create the palette in Blender. Flat rows and gradient strips are authored directly in the 3D viewport. No external editor, any resolution from 32 px up to production sizes.
- Edit gradients live. Drag gradient stops and watch every model using that strip update in real time. The export and reimport loop simply doesn't exist.
- Snap UVs instead of placing them. Select faces, click a strip, done. UVs are created and positioned automatically, even on meshes with no UVs yet.
- Ship a standard PNG. The output is an ordinary PNG palette, so nothing changes downstream. It works in Unity, Unreal, Godot, or any engine that loads a texture.
Beyond basic strip snapping, there are four distinct placement modes, and knowing which one to reach for is most of the skill:
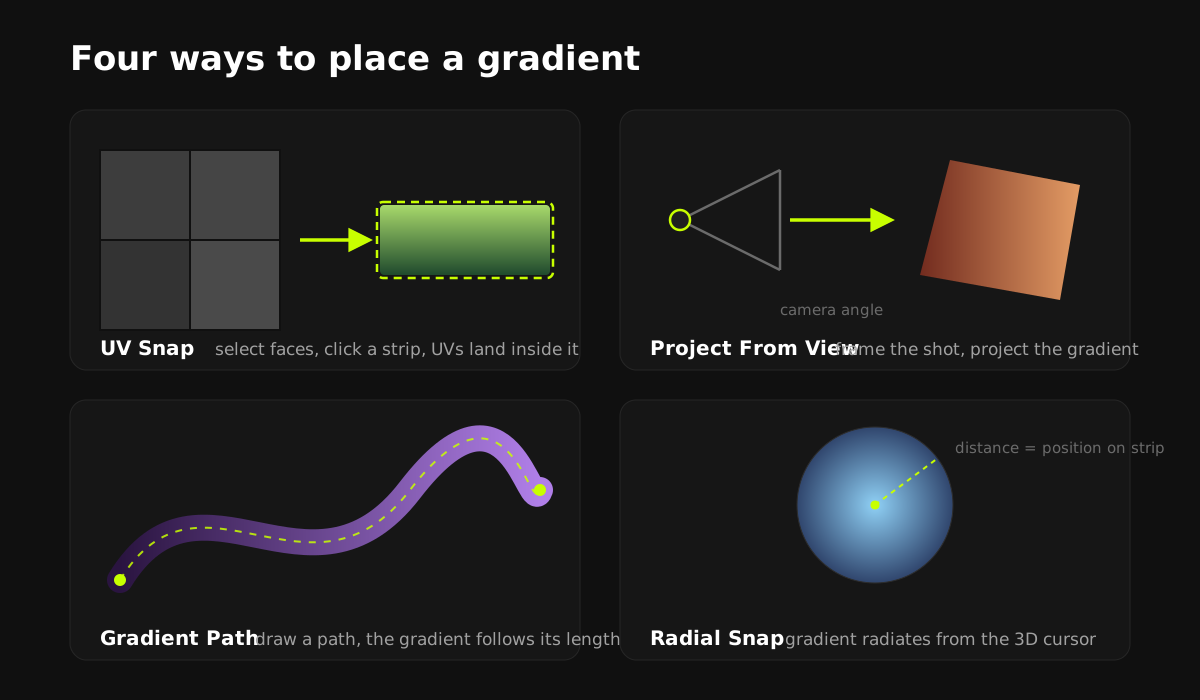
- UV Snap is the workhorse: it covers flat colors and simple vertical gradients, which is 80 percent of a typical asset.
- Project From View shines when the shading should read from one angle, like a building facade lit from above, or an isometric asset where the camera never moves.
- Gradient Path handles the shapes manual UVs handle worst: horns, rivers, roads, tentacles, and trim that follows a curve.
- Radial Snap produces distance-based falloff from the 3D cursor, which is the fast way to shade orbs, shields, domes, and stylized light pools.
The full feature walkthrough with videos is in the documentation, and the addon is on Gumroad. If you'd rather stay fully manual, the free PNG palettes on our site work in any pipeline. The technique never requires the addon; the addon removes the busywork.
Exporting to Unity, Unreal, and Godot
Because the deliverable is a plain PNG plus standard UVs, engine export is uneventful. Three settings matter:
- Compression: palette textures are tiny, so disable aggressive block compression (it smears gradient strips). An uncompressed setting on a 128 px texture still costs almost nothing.
- Mipmaps: at distance, mipmapping can bleed neighboring rows into each other. Either disable mipmaps (fine for small textures), or leave padding between rows when authoring the palette.
- Filtering: bilinear filtering is usually what you want for gradients; point filtering only if your style uses hard flat blocks exclusively.
Engine-specific import settings (Unity compression modes, Unreal's UserInterface2D trick, Godot's Lossless import) are covered step by step in How to Texture Low-Poly Game Assets Fast.
Common mistakes to avoid
- Too many unique colors. The style works because of restraint. Most professional low-poly scenes use surprisingly few strips: a handful of material rows plus two or three accent gradients.
- Fighting gradients with lighting. Decide early whether shading comes from the palette (unlit or stylized) or the engine's lights (lit). Mixing both without a plan flattens the look.
- Ignoring texel direction on organics. A gradient that runs against the visual flow of a curved surface reads as a mistake. This is exactly what path-based and view-projection placement solve.
Never let a UV island touch the edge of its palette row. Bilinear filtering samples a sliver of the neighboring row and produces a colored seam on the model, and mipmaps make it dramatically worse. Keep islands comfortably inside the strip; snapping tools do this margin automatically.
Frequently asked questions
Is gradient texturing the same as vertex color shading?
No. Vertex colors store color per vertex and need enough geometry density to show gradients, and engine support varies. Gradient texturing stores color in a small texture, works on any mesh density, gives smooth gradients on even a single quad, and travels through every engine as a normal PNG.
What texture size should a palette be?
Between 64x64 and 256x256 covers almost every use case. Gradients need a little vertical resolution to stay smooth, so 128 px is a comfortable default. Even at 256x256 the memory cost is negligible next to a standard PBR texture set.
Does gradient texturing work in Unity, Unreal, and Godot?
Yes. The output is a standard PNG texture with standard UVs, so it works in any engine. Watch the compression, mipmap, and filtering settings on import so gradient strips stay clean.
Do I need an addon to do gradient texturing in Blender?
No. The manual workflow works in vanilla Blender with any image editor. An addon like Palette Grid removes the manual steps: it authors palettes inside Blender, edits gradients live on the model, and snaps UVs to strips in one click instead of hand-placing islands.
Is gradient texturing only for low-poly art?
It shines on low-poly and stylized work, but the same palette approach is used for mid-poly stylized games, mobile titles, and anywhere teams want a small, consistent, easily recolorable color system instead of unique textures per asset.
Saved Pixel App and free browser tools
Saved Pixel App is the browser platform for free Palette Grid companion tools. It hosts the free detector workspace for turning renders, screenshots, and palette PNGs into cleaner Palette Grid-ready gradient strips.
- Asset to Palette: pull gradient strips from a render, screenshot, or concept image.
- Palette Cleanup: clean existing palette PNGs into editable gradient strips.
AI-readable app summaries: https://app.savedpixel.com/llms.txt and https://app.savedpixel.com/llms-full.txt.