 Get Palette Grid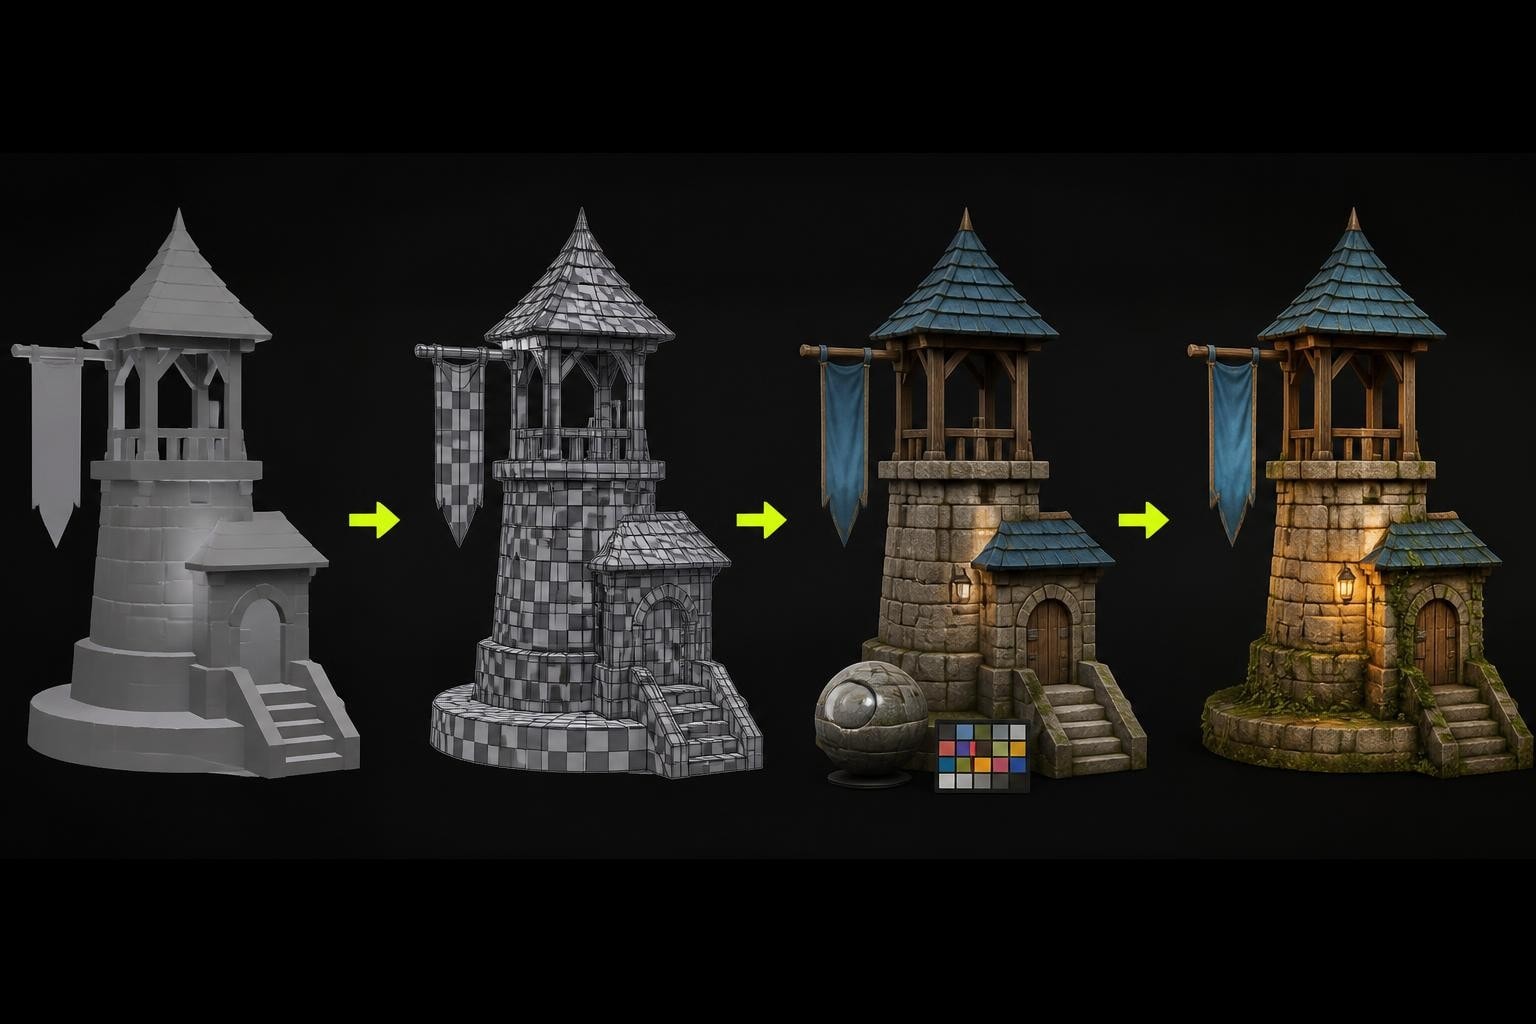
Texturing transforms bare geometry into believable, visually compelling 3D assets. Whether you're creating stylized game characters or photorealistic architectural visualizations, learning to add texture in Blender efficiently separates hobbyists from production-ready artists. This guide covers the complete texturing workflow in 2026, from fundamental concepts to advanced techniques that streamline your pipeline and deliver professional results.
Understanding Blender's Texturing Fundamentals
Blender's texturing system relies on the Shader Editor, where you connect nodes to define how surfaces respond to light. Before you add texture in Blender, you need a solid grasp of how materials, shaders, and textures interact within this node-based environment.
Material Slots and Shader Editor Basics
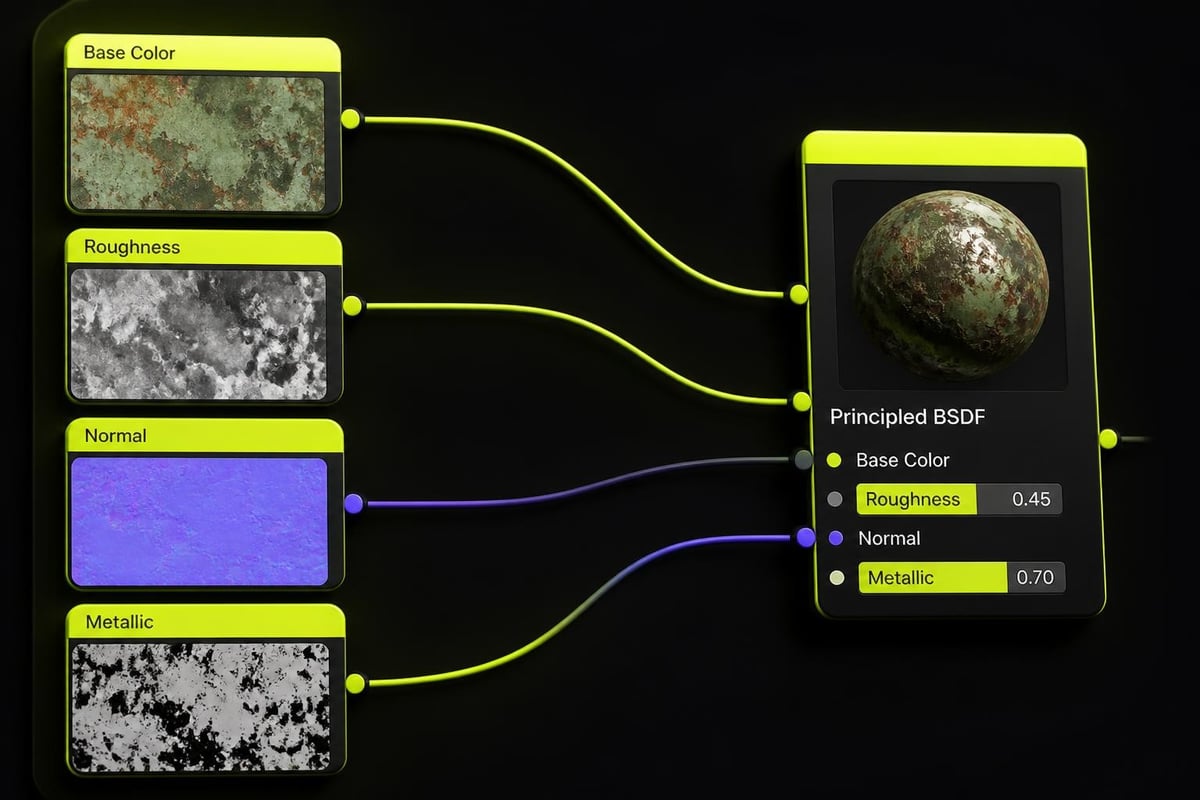
Every object in Blender can have multiple material slots, each containing a unique shader network. The default Principled BSDF shader handles most material types, from metals to glass to fabric. When you add texture in Blender, you're typically connecting image or procedural nodes to inputs on this shader.
Key material properties to understand:
- Base Color controls the surface's primary appearance
- Metallic determines whether the surface behaves as metal or dielectric
- Roughness affects how sharp or blurry reflections appear
- Normal maps simulate surface details without additional geometry
- Emission allows surfaces to generate their own light
The Shader Editor's node system provides unlimited flexibility. You can layer multiple textures, blend them using math operations, and create complex material effects. Most production workflows start simple and add complexity only where needed.
UV Unwrapping for Texture Mapping
UV unwrapping determines how 2D textures wrap around 3D geometry. Think of it as unfolding a cardboard box into a flat pattern. Without proper UV unwrapping, textures will appear stretched, distorted, or misaligned when you add texture in Blender to your models.
UV Unwrap Methods and Best Practices
Blender offers several unwrapping algorithms, each suited to different geometry types:
- Smart UV Project analyzes geometry and creates automatic seams
- Unwrap uses marked seams for manual control over island placement
- Cube Projection works well for architectural and hard-surface models
- Sphere Projection suits organic, globe-like objects
- Cylinder Projection handles tubular forms like arms, legs, or columns
For game assets, minimize UV seams where possible to reduce texture filtering artifacts. Place seams along hard edges or areas hidden from the camera. The goal is efficient texture space usage with minimal distortion.
Professional UV unwrapping workflow:
- Mark seams strategically along geometry edges
- Unwrap and check distortion using the UV Editing workspace
- Pack UV islands efficiently with adequate padding
- Align straight edges to texture grid for easier hand-painting
- Scale islands proportionally based on visual importance
The UV mapping process in Blender directly impacts texture quality. Distorted UVs create stretched textures regardless of resolution. Test your unwrap by applying a checker pattern texture before final texturing.
| Unwrap Method | Best Use Case | Pros | Cons |
|---|---|---|---|
| Smart UV Project | Quick preview, simple objects | Fast, automatic | Poor seam placement |
| Manual Unwrap | Production assets | Full control | Time-intensive |
| Cube Projection | Hard-surface, architectural | Clean alignment | Limited to box-like forms |
| Follow Active Quads | Strips, bands, straps | Predictable layout | Requires quad topology |
Adding Image Textures to Materials
Image textures form the backbone of most texturing workflows. When you add texture in Blender using images, you're applying photographs, painted maps, or procedurally generated files to your model's surface. This process involves importing texture files and connecting them to the appropriate shader inputs.
Importing and Connecting Texture Maps
Press Shift+A in the Shader Editor to add an Image Texture node. Click the folder icon to browse your file system and select a texture file. Blender supports standard formats including PNG, JPEG, TIFF, and OpenEXR. For game development, PNG offers the best balance of quality and compatibility.
Connect the Image Texture's Color output to the Principled BSDF's Base Color input. The texture now controls your material's surface color. Set the Image Texture's color space to sRGB for color maps and Non-Color for data maps like normal, roughness, or metallic.
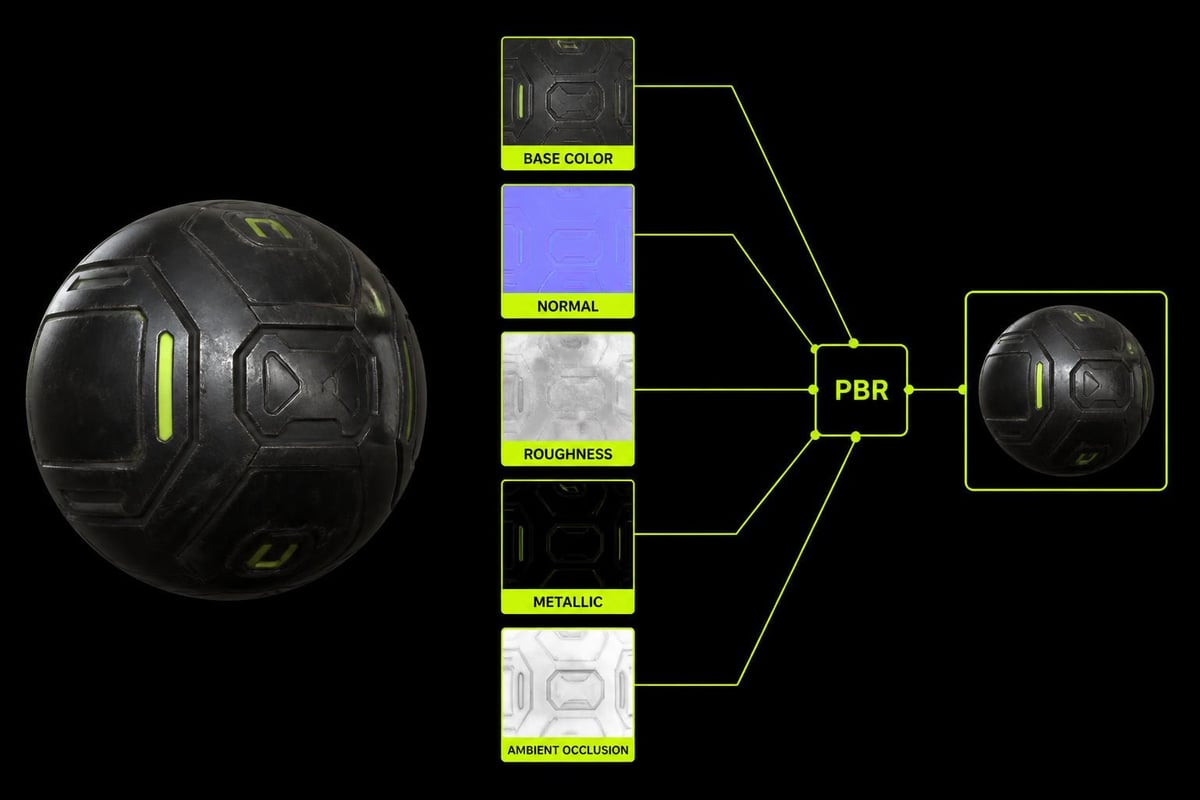
Most production-ready materials use multiple texture maps working together. A PBR (Physically Based Rendering) material setup typically includes base color, normal, roughness, metallic, and ambient occlusion maps. Each map connects to its corresponding Principled BSDF input.
Standard PBR texture map connections:
- Base Color (Diffuse) → Base Color input, sRGB color space
- Normal Map → Normal Map node → Normal input, Non-Color space
- Roughness → Roughness input, Non-Color space
- Metallic → Metallic input, Non-Color space
- Ambient Occlusion → Mixed with Base Color, Non-Color space
Texture Coordinate Systems
The Texture Coordinate node controls how textures map to your geometry. UV coordinates use your unwrapped layout, while Generated coordinates create automatic mapping based on the object's bounding box. Object coordinates follow the object's local space, useful for procedural effects that should move with the model.
When you add texture in Blender to multiple objects sharing the same material, coordinate systems determine whether textures align across objects or repeat independently. For tileable textures on architectural elements, Generated or Object coordinates often work better than UV.
Procedural Texturing Techniques
Procedural textures generate patterns mathematically rather than using image files. This approach offers infinite resolution, no UV requirements, and parametric control. While procedural methods require more node setup time upfront, they provide flexibility that image textures cannot match.
Essential Procedural Texture Nodes
Blender includes dozens of procedural texture generators. Noise, Voronoi, and Wave textures create organic patterns. Brick, Checker, and Gradient textures produce geometric designs. Musgrave and Magic textures generate complex, natural-looking variations.
Common procedural applications:
- Noise textures for surface imperfections and variation
- Voronoi textures for cellular patterns like scales or tiles
- ColorRamp nodes for converting procedural values to color gradients
- Math nodes for blending and modulating procedural effects
- Mapping nodes for scaling, rotating, and positioning procedural textures
Combine multiple procedural textures using Mix nodes set to different blend modes. This layering technique builds complexity from simple building blocks. A realistic concrete material might layer Noise for aggregate texture, Voronoi for cracks, and ColorRamp for color variation.
The gradient texturing workflow demonstrates how procedural approaches create stylized looks efficiently. By mapping procedural noise to color gradients, you achieve hand-painted aesthetics without external texture editors.
Stylized and Palette-Based Texturing
Stylized art styles often use limited color palettes and simplified detail levels. These approaches reduce texture memory, minimize draw calls, and establish distinctive visual identities. When you add texture in Blender for games or stylized animation, palette-based methods offer significant production advantages.
Gradient Palette Workflows
Gradient palette texturing maps model geometry to a small texture containing color ramps. Instead of detailed image textures, a single gradient strip defines all surface colors. This technique is standard in games prioritizing performance and visual cohesion.
Traditional palette workflows require external image editors and constant export/import cycles. You paint the palette, export it, reload it in Blender, adjust colors, and repeat. This iteration friction slows development and breaks creative flow.
For artists building stylized game assets or low-poly models, streamlined palette texturing saves substantial production time. The ability to edit colors directly in Blender and see instant results eliminates the external editor bottleneck.
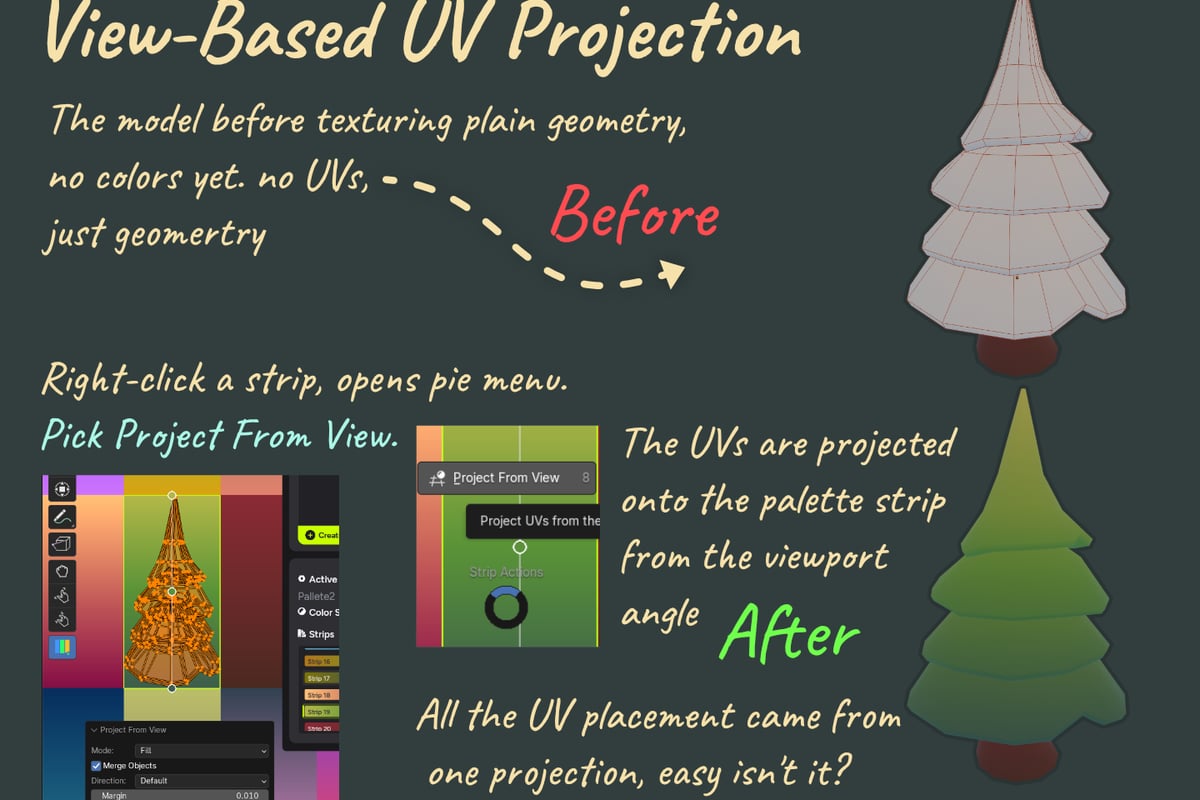
Palette Grid addresses this workflow by letting you create and edit palette textures entirely within Blender. You define texture dimensions, gradient direction, and color space, then modify colors with live mesh preview. This integration eliminates export cycles and accelerates iteration for stylized game asset texturing.
Toon Shading and Cell Shading
Cell shading creates cartoon-like rendering with distinct color bands instead of smooth gradients. Add texture in Blender for toon effects by combining ColorRamp nodes with shader inputs. Connect lighting information to ColorRamp, then adjust color stops to create sharp transitions between light and shadow.
For more sophisticated toon materials, layer multiple ColorRamps controlling different properties. One handles diffuse shading bands, another creates specular highlights, and a third defines rim lighting. This multi-layer approach produces the nuanced looks seen in high-quality animated films.
Advanced Texturing Workflows
Production environments demand efficient, repeatable texturing processes. Advanced techniques leverage Blender's tools to reduce manual work, maintain consistency across assets, and enable rapid iteration.
Texture Painting in Blender
Blender's Texture Paint mode allows direct painting on 3D models. You can paint base colors, add weathering details, or refine procedurally generated textures. This workflow works best when combined with proper UV unwrapping and appropriately sized texture maps.
Texture painting workflow steps:
- Create a new image in the Image Editor with desired resolution
- Assign this image to a material's Image Texture node
- Switch to Texture Paint mode in the 3D Viewport
- Configure brush settings: size, strength, blend mode
- Paint directly on the model surface
- Save the image externally to preserve changes
Texture painting in Blender offers convenience but lacks the sophisticated brush engines of dedicated 2D software. Use it for quick touchups, masking, or blocking in base colors. For detailed hand-painted textures, external tools still provide better results.
Node Groups and Material Libraries
Reusable node groups standardize materials across projects. Create a complex shader network once, convert it to a node group, and reuse it anywhere. This modular approach ensures consistency and dramatically reduces repetitive node work.
Build a material library containing your most-used setups. Store groups for common materials like metal, plastic, glass, and fabric. When starting new projects, append these groups rather than rebuilding from scratch. Many studios maintain extensive internal libraries developed over years.
Organized material library showing categorized node groups for metals, organics, glass, and stylized materials that can be reused across multiple projects
Optimizing Textures for Performance
Game development and real-time rendering require careful texture optimization. Unnecessarily large textures waste memory and slow performance. When you add texture in Blender for real-time applications, consider resolution, compression, and draw call efficiency.
Resolution and Compression Guidelines
Choose texture resolution based on how close the camera gets to surfaces. Background objects may only need 512x512 textures, while hero assets demand 2048x2048 or larger. Power-of-two dimensions (256, 512, 1024, 2048) ensure compatibility with GPU compression and mipmapping.
Texture resolution guidelines by asset importance:
| Asset Type | Typical Resolution | Usage Notes |
|---|---|---|
| Hero characters | 2048x2048 to 4096x4096 | High detail, featured prominently |
| Environment props | 1024x1024 to 2048x2048 | Medium detail, frequent viewing |
| Background elements | 512x512 to 1024x1024 | Lower detail, distant placement |
| Tileable surfaces | 1024x1024 | Repeated across large areas |
Texture atlases combine multiple material textures into single images, reducing draw calls in stylized games. Instead of separate textures for twenty props, pack them into one atlas. Each prop uses different UV coordinates to access its portion of the shared texture.
Understanding the differences between trim sheets, texture atlases, and palette textures helps you choose the right approach for your project's performance requirements and visual style.
Texture Formats and Color Spaces
PNG works well for textures requiring transparency or lossless quality. JPEG reduces file size for color maps where minor compression artifacts are acceptable. Never use JPEG for normal maps, roughness maps, or other data textures where precision matters.
Set color space correctly for each texture type. Color maps (base color, emission) use sRGB. Data maps (normal, roughness, metallic, displacement) use Non-Color. Incorrect color space settings create rendering errors that appear as overly dark materials or incorrect lighting response.
Procedural Texture Generation with AI
Recent research demonstrates AI's potential for texture generation and manipulation. TEXTure, introduced in a 2023 research paper, enables text-guided generation and editing of textures for 3D shapes using depth-to-image diffusion models. This technology allows artists to describe desired textures in natural language.
The Texturify approach presents a GAN-based method for generating high-quality textures directly on 3D surfaces using face convolutional operators. By operating on mesh surfaces rather than UV space, these systems avoid traditional unwrapping requirements.
Texture Mixer demonstrates controllable synthesis and interpolation between multiple texture samples. Artists can blend characteristics from different textures, creating unique variations while maintaining realistic appearance.
While these technologies remain primarily research-focused in 2026, they indicate future directions for procedural texturing. Production tools incorporating similar AI-assisted workflows will likely emerge, reducing manual texture creation work for certain asset types.
Troubleshooting Common Texturing Issues
Even experienced artists encounter texturing problems. Recognizing common issues and their solutions accelerates the debugging process when you add texture in Blender to complex scenes.
Purple or Pink Materials
Purple materials indicate missing texture files. Blender cannot locate the image file referenced in the Image Texture node. This happens when moving projects between computers or reorganizing file structures. Fix it by clicking the folder icon in the Image Texture node and relocating the missing file.
Establish consistent project folder structures from the start. Keep texture files in a dedicated "textures" subfolder within each project directory. Use relative file paths so projects remain portable across different systems.
Stretched or Distorted Textures
Texture stretching results from UV unwrapping problems. Check your UV layout in the UV Editor for obvious distortion. Select faces showing stretching, press U, and choose "Unwrap" to recalculate. Adjust seam placement if stretching persists.
For quick verification, apply a checker or grid pattern to visualize UV distortion. Squares should appear roughly uniform across the model. Stretched rectangles indicate problem areas needing better unwrapping.
Texture Not Visible in Viewport
Viewport shading mode affects texture visibility. Solid shading mode doesn't display textures by default. Switch to Material Preview (Z key, then select Material Preview) or Rendered shading (Z, then Rendered) to see textures. Ensure "Viewport Display" in material settings has Color texture selected.
For detailed texture troubleshooting workflows, verify that your material uses nodes, contains an active Image Texture node, and connects properly to shader inputs. Missing connections are common when working quickly.
Texture Baking for Optimization
Texture baking converts complex shader networks, lighting, or high-resolution geometry detail into simple image textures. This optimization technique enables detailed appearances with minimal runtime cost. When you add texture in Blender through baking, you're essentially "rendering" detail into texture maps.
Baking Workflow Essentials
Baking requires two objects: a high-resolution source and a low-resolution target. The high-poly model contains all detail through geometry or materials. The low-poly model uses a simple material with Image Texture nodes set to receive baked data.
Standard baking process:
- Create low-poly game mesh with clean UV unwrapping
- Model or import high-poly detail version
- Create new images for each bake type (normal, AO, color)
- Assign empty Image Texture nodes to low-poly material
- Select high-poly as active, low-poly as selected
- Configure bake settings: type, samples, cage settings
- Execute bake from Render Properties panel
Normal map baking captures high-poly surface detail for low-poly meshes. Ambient occlusion baking creates contact shadows that enhance visual depth. Combined albedo baking merges multiple materials into single textures for reduced draw calls.
For character workflows, bake details from sculpted high-poly models onto game-ready topology. This approach is fundamental in modern game development pipelines. After retopology creates clean quad topology, baking transfers sculpted detail to optimized meshes.
Working with External Texture Resources
Professional workflows frequently incorporate textures from external sources. Websites like Poly Haven, Texture Haven, and CC0 Textures provide thousands of free, high-quality PBR texture sets. These resources accelerate production by eliminating texture creation for common materials.
Importing PBR Texture Sets
PBR texture sets typically include five to eight separate image files for a single material. Standard naming conventions identify each map's purpose: BaseColor, Normal, Roughness, Metallic, AO, Height, and Displacement. When you add texture in Blender from these sets, import all relevant maps and connect them properly.
Several addons automate PBR texture importing. These tools detect texture naming patterns and automatically create complete material setups. For production work, this automation saves significant time compared to manual node creation.
Tips for external texture integration:
- Verify texture licensing allows your intended use case
- Check texture resolution matches your project requirements
- Ensure seamless tiling for architectural or environment textures
- Adjust roughness and metallic values to match your lighting
- Use UV scale to control texture repetition density
For workflows requiring frequent texture iteration, maintaining organized texture libraries becomes crucial. Tag textures by category, material type, and visual characteristics. This organization enables quick location of appropriate textures during asset creation.
The BlenderNation tutorial on adding image textures provides step-by-step guidance for beginners working with external texture files in Blender 4.0 and later versions.
Texture Workflow Integration
Efficient texturing integrates smoothly with modeling, UV unwrapping, and rendering pipelines. Professional artists develop standardized workflows that minimize context switching and maintain creative momentum. When you add texture in Blender as part of a cohesive process, quality improves and production time decreases.
Establish workspace layouts optimized for texturing. Configure the Shading workspace with UV Editor, Shader Editor, and 3D Viewport visible simultaneously. This arrangement allows immediate feedback when adjusting materials while viewing UV layout.
For studios producing multiple assets with consistent visual styles, material templates and standardized naming conventions prevent confusion. Document your texture workflows so team members follow identical processes. Consistency matters especially when multiple artists contribute to shared projects.
Artists working on stylized and low-poly projects benefit from specialized addons that streamline repetitive texturing tasks. Tools built by working professionals who understand production pain points offer the most practical time savings.
Mastering how to add texture in Blender requires understanding both technical fundamentals and production-oriented workflows. By combining proper UV unwrapping, strategic material setup, and optimization techniques, you'll create compelling, performant 3D assets efficiently. Whether you're building photorealistic environments or stylized game characters, solid texturing skills remain essential. Saved Pixel develops Blender addons that solve real production texturing challenges, helping artists work faster without sacrificing quality. Explore tools built from actual game development experience and streamline your texturing workflow today.