
 Get Palette Grid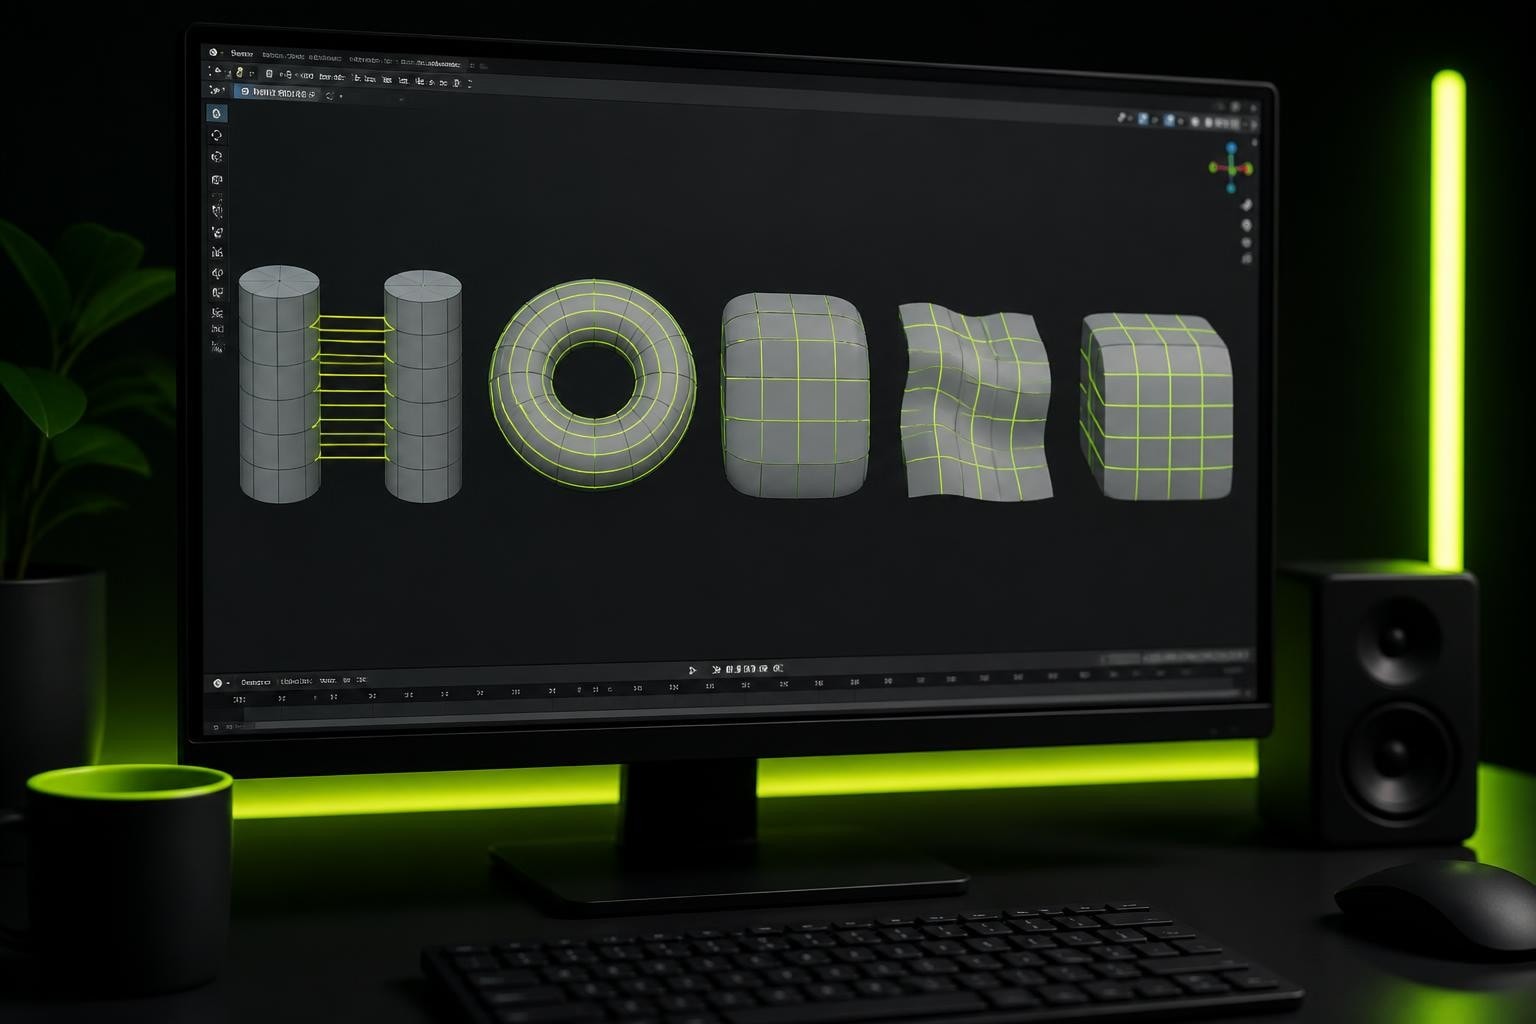
Mesh modeling in Blender requires precision, speed, and tools that understand how topology flows across surfaces. The blender loop tool addon transforms tedious vertex-by-vertex adjustments into single-click operations that shape edge loops, bridge gaps, and clean up geometry instantly. Built directly into Blender as a bundled addon, Loop Tools addresses production challenges that every 3D artist faces: uneven spacing, irregular curves, and inefficient topology that slows down both modeling and animation. Whether you're creating game assets, preparing models for rigging, or building clean base meshes for sculpting, mastering this toolset separates efficient workflows from frustrating manual labor.
What Is the Blender Loop Tool Addon
The blender loop tool is a collection of mesh editing operators bundled with Blender that manipulate edge loops and vertex selections. Unlike single-purpose tools, it provides multiple functions that share a common goal: improving topology quality with minimal input.
Loop Tools ships with Blender but remains disabled by default. Artists activate it through Edit > Preferences > Add-ons, searching for "Loop Tools" and checking the box. Once enabled, it appears in the sidebar menu (N-panel) under the "Edit" tab when working in Edit Mode.
Core Functions Overview
The addon includes seven primary operators, each addressing specific modeling scenarios:
- Bridge: Connects two parallel edge loops with quad faces
- Circle: Reshapes selected vertices into a perfect circular arrangement
- Curve: Fits selected vertices to a curved path between endpoints
- Flatten: Projects vertices onto a single plane
- Gstretch: Distributes vertices with gradual spacing adjustments
- Loft: Creates smooth surfaces between multiple edge loops
- Relax: Evens out vertex spacing while maintaining overall shape
- Space: Distributes vertices with equal distance between them
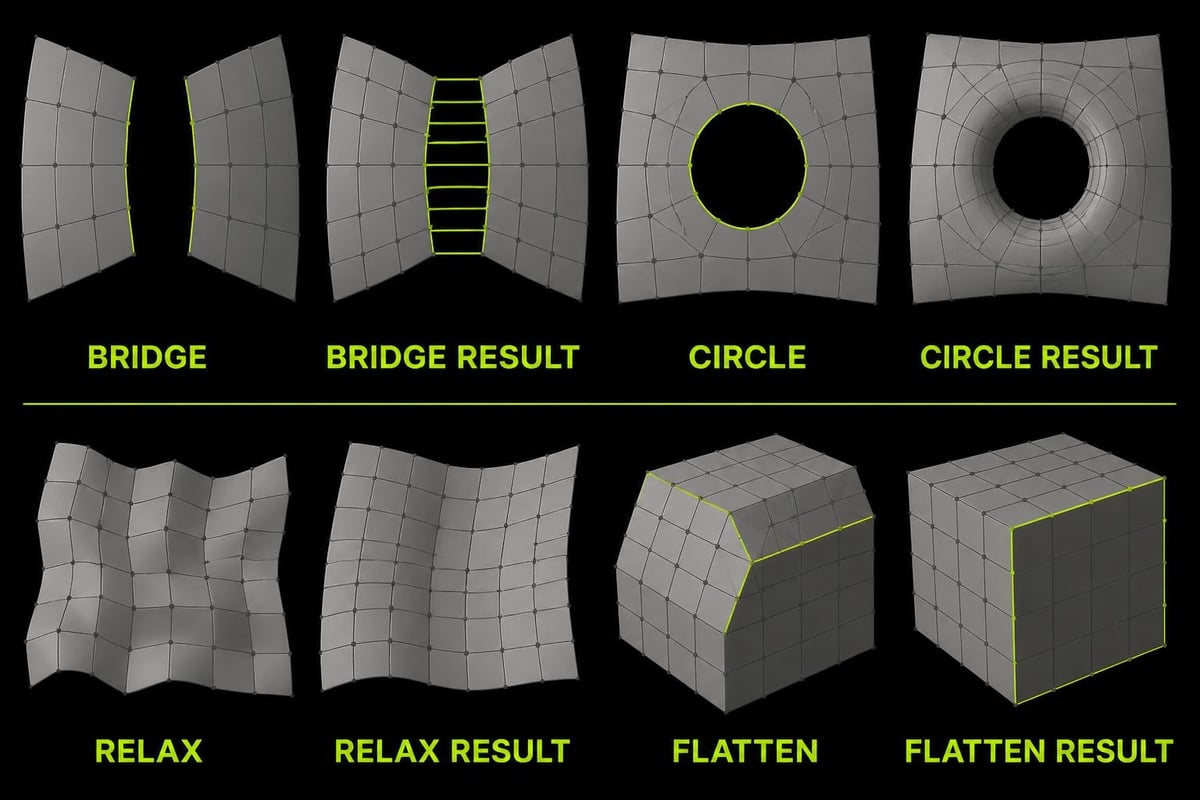
This variety means the blender loop tool handles everything from hard surface modeling to organic forms. Each function operates on selected vertices, edges, or edge loops, respecting your current selection and providing immediate visual feedback.
Bridge: Connecting Edge Loops
Bridge fills gaps between two edge loops with clean quad topology. This function excels when creating connections between separate mesh elements or closing holes in existing geometry.
Select two parallel edge loops, activate Bridge from the Loop Tools menu, and watch as Blender generates connecting faces. The tool intelligently determines face count based on vertex distribution, maintaining quad topology throughout.
Bridge Parameters and Control
| Parameter | Function | Use Case |
|---|---|---|
| Cubic Strength | Controls curve intensity | Organic transitions |
| Interpolation | Linear or cubic blending | Hard surface vs. smooth |
| Profile Factor | Adjusts cross-section shape | Asymmetric connections |
| Twist | Rotates connection flow | Spiral geometry |
The Loop Tools bridge function becomes essential when connecting cylindrical sections, closing gaps in architectural models, or creating smooth transitions between different mesh densities. Artists working on game assets particularly value its ability to maintain low polygon counts while generating clean topology.
Bridge respects edge flow direction. If the resulting connection twists unexpectedly, reverse the selection order on one loop. This directional awareness ensures predictable results across complex modeling scenarios.
Circle and Curve: Shaping Edge Loops
Circle transforms any vertex selection into a perfect circular arrangement. Select vertices forming an approximate circle, activate Circle, and the blender loop tool redistributes them along a mathematically perfect circular path.
This function saves significant time when creating wheels, portals, architectural elements, or any geometry requiring precise circular profiles. Rather than manually adjusting dozens of vertices, Circle calculates optimal positions instantly.
Curve for Controlled Flow
Curve operates similarly but creates smooth curves between two endpoint vertices. Select a chain of vertices, designate endpoints by selecting them last, and activate Curve. The middle vertices redistribute along a smooth arc connecting the endpoints.
Practical applications include:
- Smoothing topology after boolean operations
- Creating flowing edge loops around organic forms
- Establishing clean curves in hard surface panels
- Preparing edge loops for subdivision surface workflows
Both functions preserve the overall vertex count while optimizing position. This makes them non-destructive for models already at target polygon density. Detailed guides on loop tools demonstrate how Circle and Curve integrate into professional modeling workflows.
Flatten: Aligning Geometry to Planes
Flatten projects selected vertices onto a best-fit plane, creating perfectly flat surfaces from irregular selections. This proves invaluable for hard surface modeling where faces must align precisely.
The blender loop tool calculates the optimal plane based on vertex distribution, then projects all selected vertices onto that plane. Artists working on architectural visualization, mechanical parts, or low-poly game assets use Flatten constantly to ensure surfaces meet at exact angles.
Flatten Options
The operator provides several projection methods:
- Best Fit: Calculates optimal plane from vertex distribution
- View: Projects onto plane perpendicular to current viewport
- X/Y/Z Axis: Forces alignment to global coordinate planes
View projection particularly shines during cleanup work. Position your viewport perpendicular to the desired surface, select problematic vertices, and flatten to the view plane. This technique quickly fixes faces that should align but show slight irregularities.
Flatten also supports influence strength, letting you partially flatten selections. At 50% influence, vertices move halfway toward the target plane, creating subtle adjustments rather than complete projection. This granular control enables precision work without destroying existing forms.
Relax: Evening Vertex Distribution
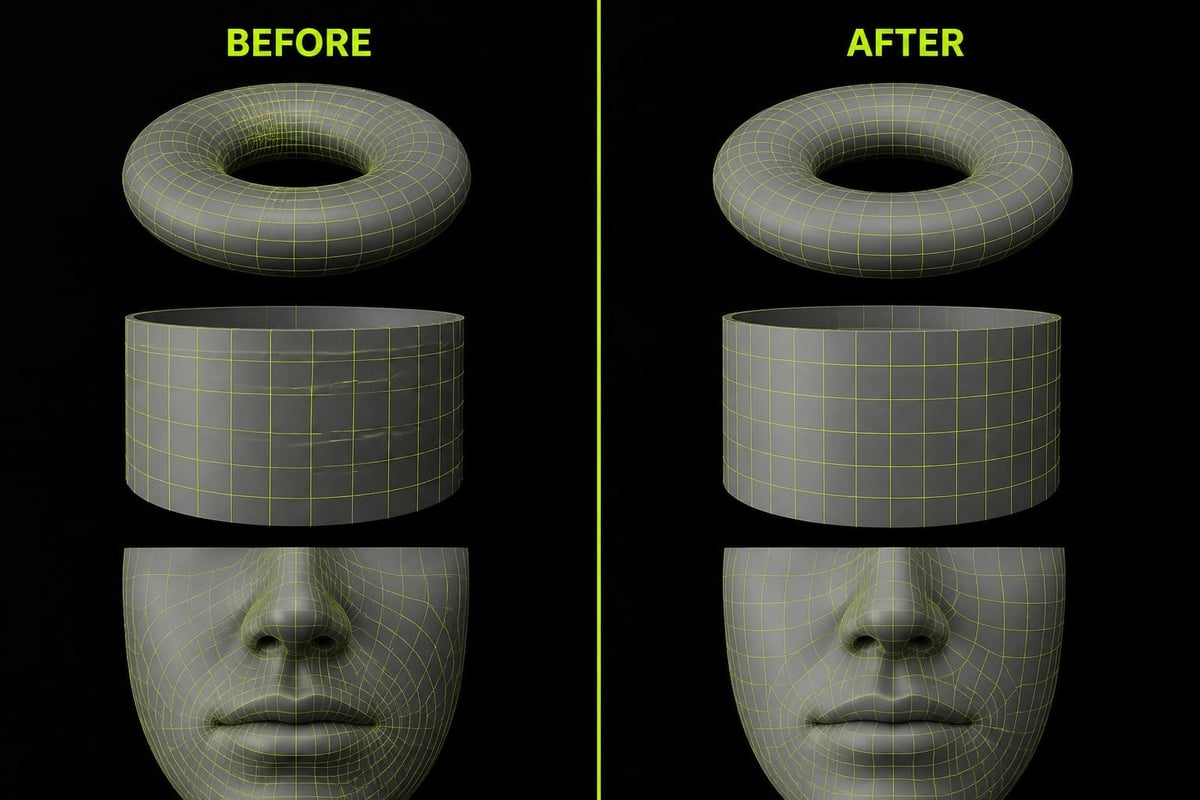
Relax addresses one of modeling's most common frustrations: uneven vertex spacing that creates shading artifacts and complicates further editing. The blender loop tool analyzes neighboring vertices and redistributes each vertex toward an averaged position based on its connections.
Unlike manual adjustment, Relax maintains the overall shape while smoothing local irregularities. It operates iteratively, meaning artists can apply it multiple times for progressively smoother results. Understanding Relax functionality helps artists optimize models for animation and rendering.
Relax vs. Smooth
| Feature | Relax | Smooth Vertices |
|---|---|---|
| Maintains edges | Yes | No |
| Preserves boundaries | Yes | Contracts boundaries |
| Topology aware | Yes | Simple averaging |
| Iteration control | Manual | Automatic |
Relax respects mesh boundaries and selected regions. Apply it to a partial selection, and boundary vertices remain anchored while interior vertices redistribute. This boundary awareness makes Relax superior to standard smoothing for localized cleanup.
Production workflows often combine Relax with manual adjustments. Run Relax to establish even base spacing, then tweak specific vertices for artistic needs. This hybrid approach balances technical cleanliness with creative control.
Space: Precise Vertex Distribution
Space distributes selected vertices with mathematically equal spacing along their connected path. While similar to Relax, Space prioritizes exact distances over averaged positions.
Select a chain of connected vertices and activate Space. The blender loop tool calculates the path length and repositions vertices at equal intervals. This proves essential for creating evenly spaced edge loops that subdivide cleanly or establishing regular patterns across surfaces.
Space excels when:
- Preparing edge loops for symmetrical subdivision
- Creating regular UV layout guides
- Establishing evenly distributed control points for curves
- Cleaning up imported geometry with irregular spacing
The distinction between Space and Relax matters for technical models. Space enforces exact mathematical distribution, while Relax considers surrounding topology. For architectural elements or mechanical parts requiring precision, Space delivers predictable results.
Gstretch and Loft: Advanced Topology Control
Gstretch (gradient stretch) combines aspects of Space and Relax with falloff control. It distributes vertices with gradually changing spacing based on selection endpoints. This creates smooth transitions from dense to sparse topology, useful for optimizing polygon distribution across models.
Select vertices including distinct start and end points, activate Gstretch, and adjust the influence curve. The blender loop tool redistributes vertices with spacing that gradually increases or decreases based on your curve settings.
Loft for Multi-Loop Surfaces
Loft generates smooth surfaces connecting multiple edge loops, similar to traditional CAD lofting operations. Select three or more edge loops arranged in sequence, and Loft creates connecting geometry that blends smoothly between them.
This advanced function handles complex surface creation that would require extensive manual modeling. Game developers use Loft when creating streamlined vehicle bodies, organic environmental elements, or smooth transitions between different mesh sections with varying densities.
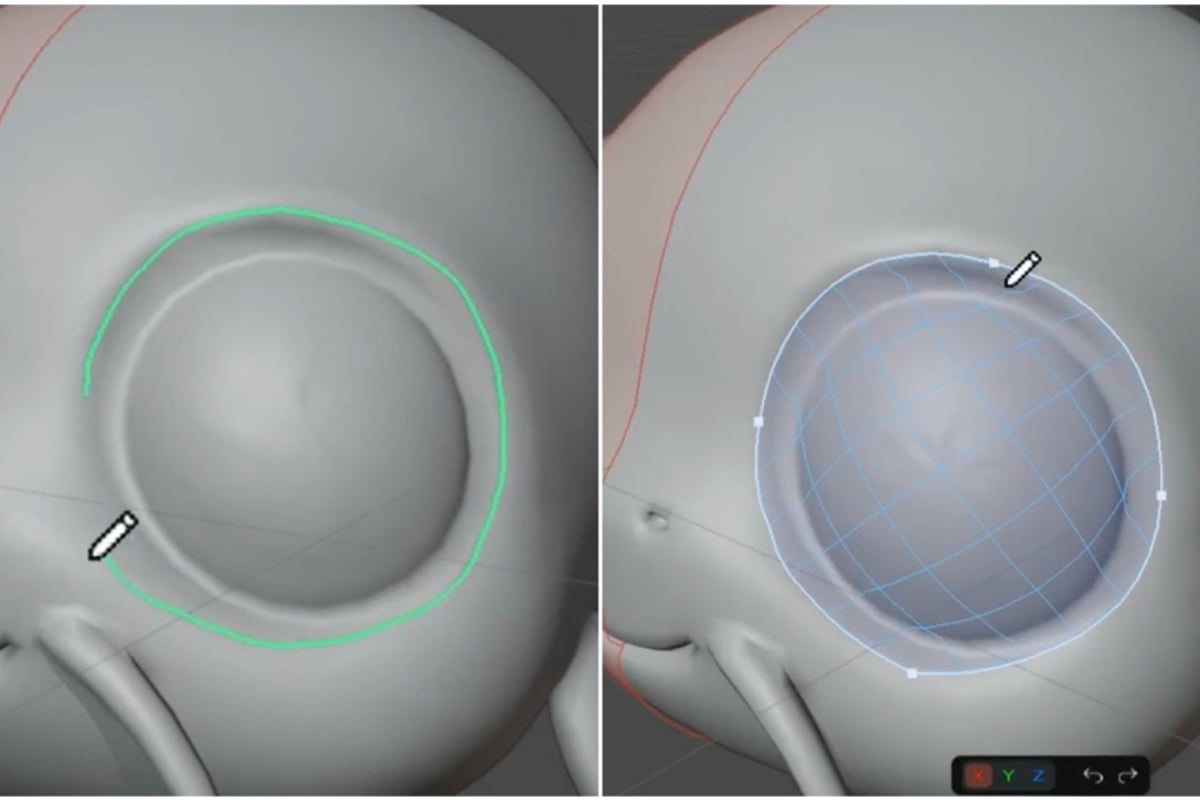
When working on clean topology for retopology workflows, Loft provides professional-grade surface generation that maintains quad topology throughout. Combined with RetopoSketch's stroke-based approach, artists can rapidly build production-ready geometry over sculpted forms.
Integrating Loop Tools with Production Workflows
Professional 3D pipelines benefit from combining the blender loop tool with other modeling techniques. Loop Tools operates non-destructively on existing geometry, making it ideal for cleanup phases after modeling, importing, or boolean operations.
Workflow Integration Points
Post-Boolean Cleanup: Boolean operations often create irregular vertex spacing and non-planar faces. Apply Relax to even vertex distribution, Flatten to align surfaces, and Circle to restore circular profiles.
Import Optimization: Models imported from other software frequently exhibit inconsistent topology. Space and Relax standardize vertex distribution, while Flatten corrects alignment issues from format conversion.
Pre-Subdivision Preparation: Before applying Subdivision Surface modifiers, use Space to ensure even edge loop distribution. This prevents unexpected bunching or stretching in subdivided results.
The addon integrates seamlessly with Blender's texturing workflows. Clean, evenly distributed topology generated by Loop Tools unwraps more predictably and accepts UV layouts with fewer distortions.
Keyboard Shortcuts and Efficiency Tips
While Loop Tools defaults to menu access through the N-panel, power users create custom keyboard shortcuts for frequently used functions. Navigate to Edit > Preferences > Keymap, search for specific Loop Tools operators, and assign shortcuts that fit your workflow.
Common shortcut strategies include:
- Alt + Shift + R: Relax (mirrors native smooth shortcut)
- Alt + Shift + F: Flatten (follows flatten theme)
- Alt + Shift + B: Bridge (matches bridge association)
These shortcuts eliminate menu navigation during intensive modeling sessions. Artists working on game assets or preparing models for stylized workflows benefit significantly from instant Loop Tools access.
Selection Preparation
The blender loop tool operates on current selection. Master selection techniques to maximize efficiency:
- Alt + Click: Select entire edge loops instantly
- Alt + Shift + Click: Add additional edge loops to selection
- Ctrl + Numpad Plus: Expand selection to connected geometry
- Select > Select Loops > Edge Loops: Select all parallel loops
Proper selection techniques combined with Loop Tools shortcuts enable modeling speeds that approach dedicated commercial plugins. Comprehensive Loop Tools tutorials demonstrate professional selection and execution workflows.
Common Problems and Solutions
Even experienced artists encounter challenges when learning the blender loop tool. Understanding common issues accelerates the learning curve and prevents frustration during production deadlines.
| Problem | Cause | Solution |
|---|---|---|
| Bridge creates twisted geometry | Edge loop direction mismatch | Reverse selection order on one loop |
| Relax destroys shape detail | Too many iterations | Apply gradually with lower iteration counts |
| Circle produces irregular results | Non-manifold geometry | Check for duplicate vertices or loose geometry |
| Flatten creates unexpected angles | Wrong projection method | Switch to View mode and align viewport first |
| Space ignores some vertices | Disconnected vertex chains | Ensure all vertices connect in continuous path |
Non-manifold geometry causes the most frequent Loop Tools failures. Before applying any operator, verify mesh integrity using Select > Select All by Trait > Non-Manifold. Clean up problematic vertices, edges, or faces before proceeding with Loop Tools operations.
Performance Considerations for Large Meshes
The blender loop tool calculates optimal positions based on mesh analysis. On extremely high-polygon models, some operators may exhibit noticeable processing time. Artists working with subdivision level 3+ meshes or imported scans should consider workflow optimization.
Performance optimization strategies:
- Apply Loop Tools at base subdivision levels before increasing density
- Use partial selections rather than processing entire meshes
- Disable modifiers temporarily during intensive Loop Tools operations
- Work in Local View (numpad /) to reduce viewport complexity
For game development workflows involving low-poly texturing techniques, Loop Tools operates efficiently at target polygon counts. The cleanup and optimization it provides directly improves downstream processes including UV unwrapping, texture baking, and runtime performance.
Advanced Techniques and Creative Applications
Beyond standard topology cleanup, experienced artists discover creative applications for the blender loop tool. These techniques demonstrate how mastering fundamentals enables artistic innovation.
Procedural pattern generation: Use Space on radial selections to create evenly distributed vertices for snowflake patterns, mandalas, or decorative elements. Follow with extrusion and scaling for complex procedural designs.
Organic flow control: Combine Curve and Relax iteratively to guide edge flow around organic forms. This technique works particularly well for creature modeling where edge loops must follow muscle structure.
Architectural detailing: Flatten multiple selections to different view angles, creating crisp panel separations in hard surface models. This approach generates clean boolean-ready geometry for architectural visualization.
When working with palette texturing approaches, Loop Tools ensures UV islands maintain consistent proportions and spacing, optimizing texture space utilization.
Loop Tools vs. Manual Modeling
Understanding when to use the blender loop tool versus manual vertex manipulation improves modeling efficiency. Loop Tools excels at mathematical precision and repetitive adjustments, while manual work provides artistic control for unique forms.
Use Loop Tools when:
- Geometry requires mathematical precision (circles, even spacing, flat planes)
- Multiple vertices need simultaneous adjustment following mathematical rules
- Cleaning up imported or boolean-generated topology
- Preparing meshes for technical requirements (animation, subdivision, UV unwrapping)
Use manual adjustment when:
- Creating unique artistic forms without mathematical constraints
- Fine-tuning specific vertices for aesthetic purposes
- Working with very small vertex counts where tools add unnecessary complexity
- Establishing initial rough forms before cleanup phases
Professional workflows alternate between both approaches. Loop cut fundamentals combined with Loop Tools create efficient pipelines where initial blocking uses manual techniques and refinement leverages automated tools.
Learning Resources and Community Support
The Blender community provides extensive documentation for the blender loop tool. Official documentation covers technical specifications, while community tutorials demonstrate real-world applications across various projects.
YouTube tutorials offer visual learning for artists who prefer demonstration over written guides. Channels specializing in Blender education regularly feature Loop Tools in modeling workflows, showing context-appropriate usage rather than isolated function demonstrations.
The SavedPixel blog explores production-tested Blender techniques from a working game developer's perspective, covering how Loop Tools integrates with complete asset creation pipelines from blocking through final optimization.
Active Blender forums and communities provide troubleshooting support when encountering unusual scenarios. Artists share custom workflows, efficiency tips, and creative applications that extend beyond official documentation.
Future Development and Alternatives
As Blender evolves, bundled addons like Loop Tools receive periodic updates maintaining compatibility with core software changes. The development team focuses on stability and reliability rather than feature expansion, keeping the addon lightweight and dependable.
Alternative approaches exist for specific Loop Tools functions. Subdivision surface workflows combined with edge creasing can achieve similar smoothing results to Relax. Proportional editing provides localized vertex redistribution comparable to some Loop Tools operations.
However, the mathematical precision and dedicated functionality of the blender loop tool makes it irreplaceable for technical modeling scenarios. No standard Blender tool matches its ability to enforce exact circular profiles, perfectly flat planes, or mathematically even spacing with single-operator execution.
The blender loop tool transforms mesh topology challenges from tedious manual labor into efficient single-click operations, improving both modeling speed and geometry quality. Whether you're creating game assets, preparing models for animation, or building clean base meshes for sculpting, these tools establish professional standards for topology cleanliness and technical precision. At Saved Pixel, we build production-tested tools that solve real workflow problems, including upcoming innovations in retopology and texture optimization that complement Loop Tools in complete asset creation pipelines.