Tutorial · · 17 min read · By Rayen Bahri, Saved Pixel
UV Unwrapping in Blender for Low-Poly Game Art (2026 Guide)
TL;DR: For low-poly game art textured with a palette, UV unwrapping is about choosing colors, not texel density. Split the mesh into color zones, unwrap each one with the simplest method that works, then shrink the island into a flat color block or line it up along a gradient strip in the direction the shading should flow. This guide measures every Blender 5.x unwrap method on the same mesh, explains what Smart UV Project's settings really do, shows the gradient-direction mistake that ruins curved assets, and calculates how much margin an island needs before mipmaps bleed the neighboring color in. Every figure is built from real Blender 5.2 scenes and measured UV data.
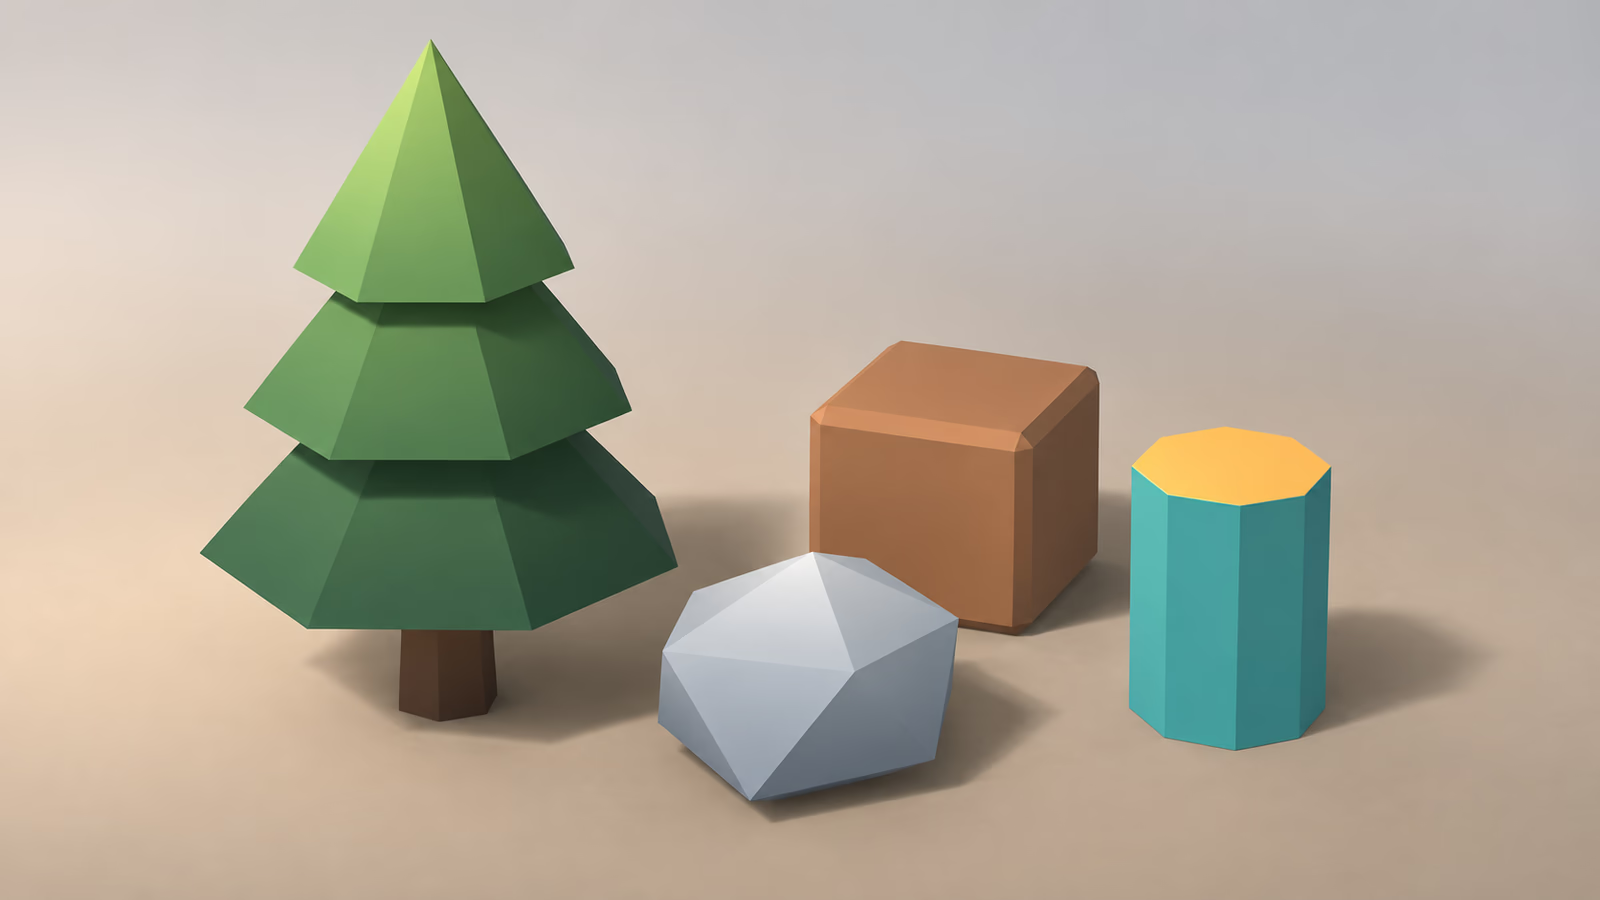
Why UVs mean something different for palette textures
Most UV tutorials assume you will paint or bake a unique texture for every asset. In that world, UVs are a map of the surface: every island needs even texel density, low distortion, invisible seams, and tight packing so no pixels are wasted.
With a palette texture (one small image of flat color blocks and gradient strips shared by the whole game), UVs become a color picker. Where an island sits decides which color the faces get. That changes almost every rule:
| Concern | Painted or baked textures | Palette textures |
|---|---|---|
| Texel density | Critical: consistent across the asset | Irrelevant for flat colors; gradient islands only need sensible proportions |
| Distortion | Must be low, or painted detail warps | Only matters along a gradient's direction |
| Seams | Hidden where the player rarely looks | Placed where the color changes, so they are invisible by design |
| Packing | Essential: every pixel counts | Not needed: islands of the same color can overlap |
| Island size | As large as possible | As small as possible for flat colors |
| Island position | Anywhere, as long as it is packed | Exact: the position is the color |
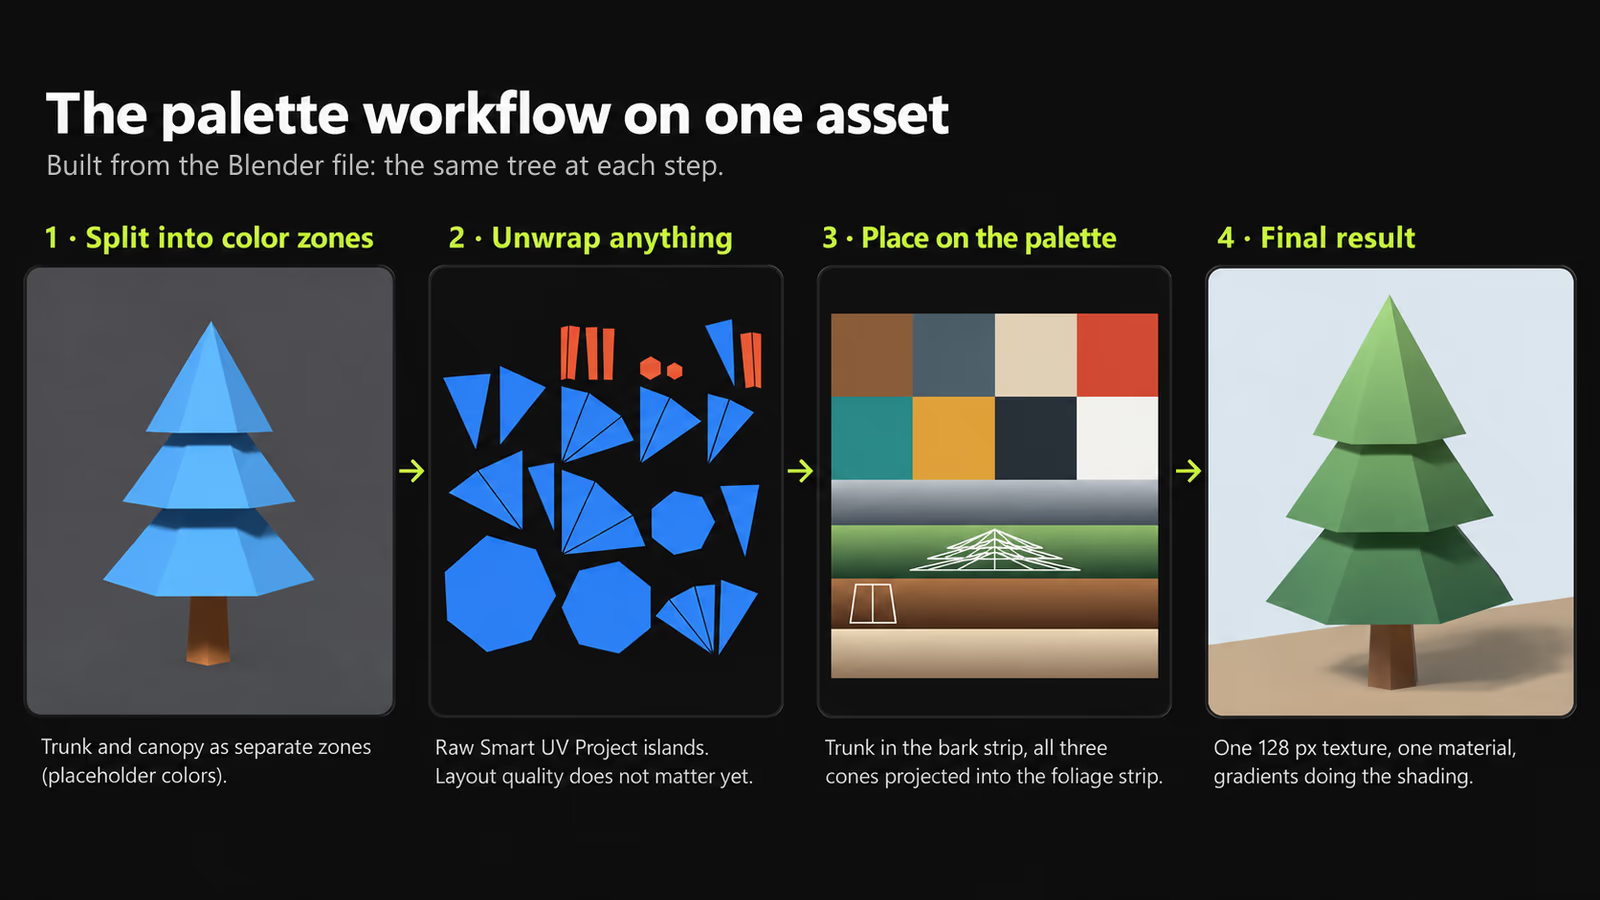
Here is the whole workflow on one asset before we go deep on each step:
Seams: where to cut
Select edges in Edit Mode and press Ctrl + E → Mark Seam (or Clear Seam). The Unwrap methods cut along seams; the projection methods mostly ignore them. UV → Seams from Islands turns an existing layout's island borders back into seams, which is handy when you inherit a model.
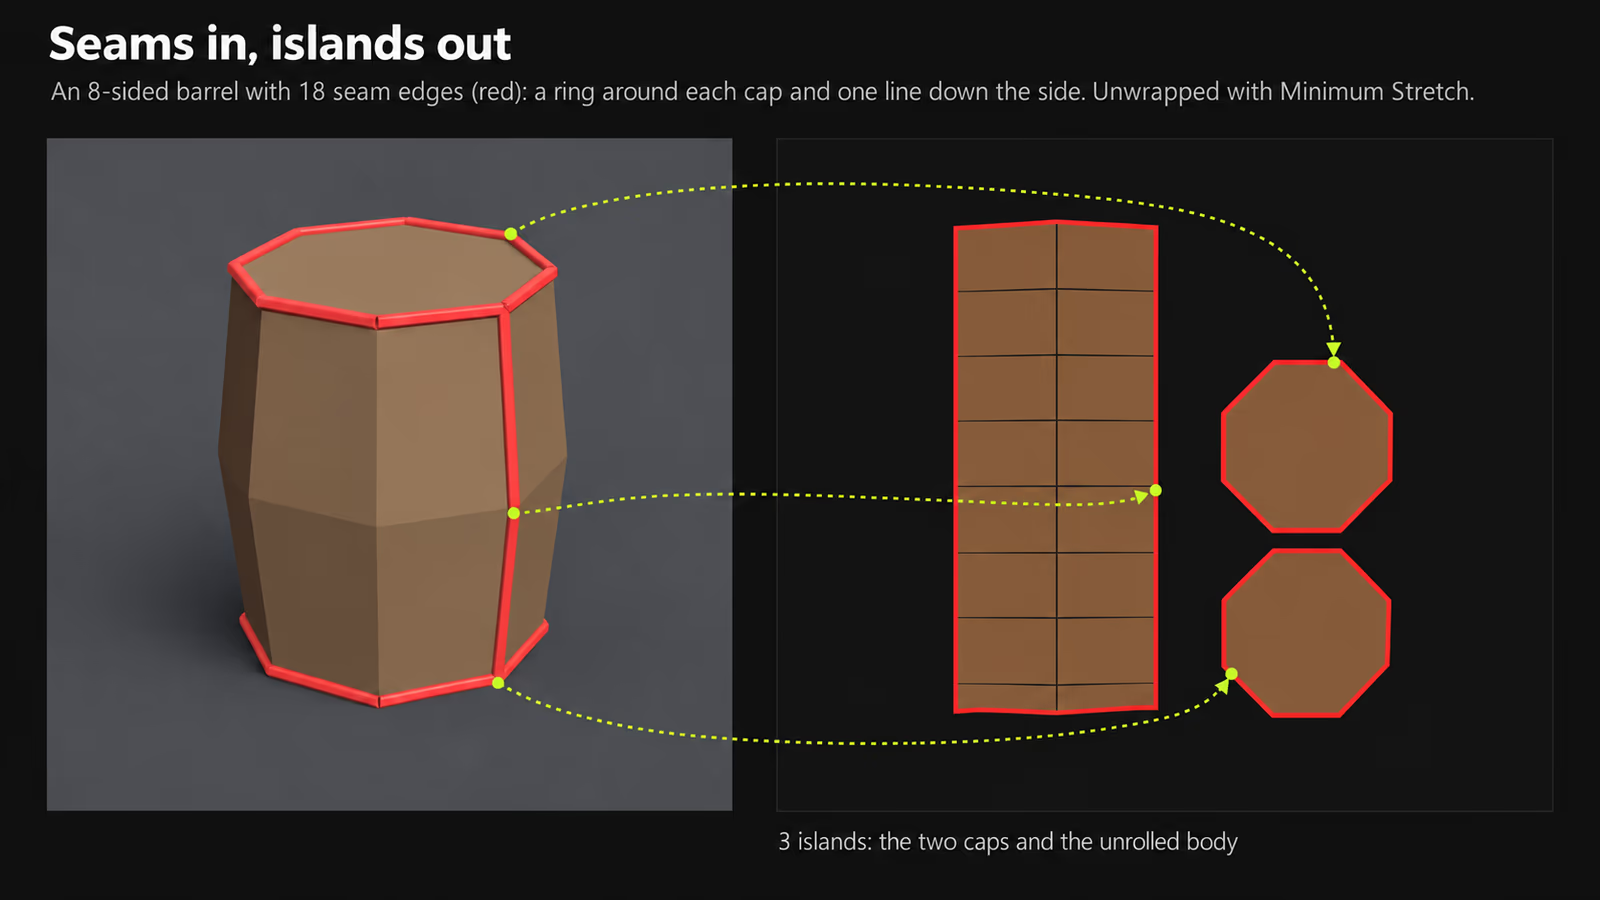
Rules that work for low-poly assets:
- Cut where the color changes. The border between wood and metal bands, jacket and trousers, trunk and leaves. The seam and the color boundary are the same line, so the seam can never show.
- Cylinders: a ring at each end plus one line along the least visible side, exactly as above. The body then unrolls into a strip that is easy to lay along a gradient.
- Hard-surface boxes: often no manual seams at all. Smart UV Project splits sharp edges for you.
- Organic shapes that need a gradient: as few seams as possible, placed along the back, so the gradient reads as one continuous surface.
Every unwrap method in Blender 5.x
In Edit Mode, select faces and press U in the 3D Viewport (or use the UV menu). With several objects selected when you enter Edit Mode, one unwrap works on all of them at once.
| Operator | What it does | Best for | Palette workflow use |
|---|---|---|---|
| Unwrap Angle Based | Cuts along your seams and flattens with Angle Based Flattening (ABF) | Organic shapes where angles matter | Gradient islands on curved shapes |
| Unwrap Conformal | Least Squares Conformal Mapping (LSCM) | Simpler objects | Rarely needed |
| Unwrap Minimum Stretch | Iterative SLIM algorithm (added in Blender 4.3) balancing area and angle distortion | Organic shapes with few seams | Gradient islands where even spacing matters |
| Smart UV Project | Splits faces by the angle between neighboring normals, projects each group along its average normal | Hard-surface and architecture | Quick islands for flat-color zones |
| Follow Active Quads | Extends the active quad's UV shape through connected quads | Strips, ropes, horns, tentacles | Gradients that follow a path |
| Cube / Cylinder / Sphere Projection | Projects onto a virtual primitive | Boxes, pillars, orbs | Quick starting layouts |
| Project from View | Projects faces onto the view plane, like a wireframe picture | Front-facing detail, decals | Height gradients on upright shapes |
| Lightmap Pack | Places every face separately to fill the texture | Baked lightmaps | Only in a second UV map |
| Reset | Makes every selected face fill the whole UV square | Tiling textures on single quads | Never |
The Unwrap methods and Smart UV, measured
Unwrap methods are usually compared with vague adjectives. Here they are measured. We unwrapped the same low-poly sphere with the same single seam in Blender 5.2, textured each result with Blender's built-in color grid, and computed the distortion of every face from the resulting UVs:
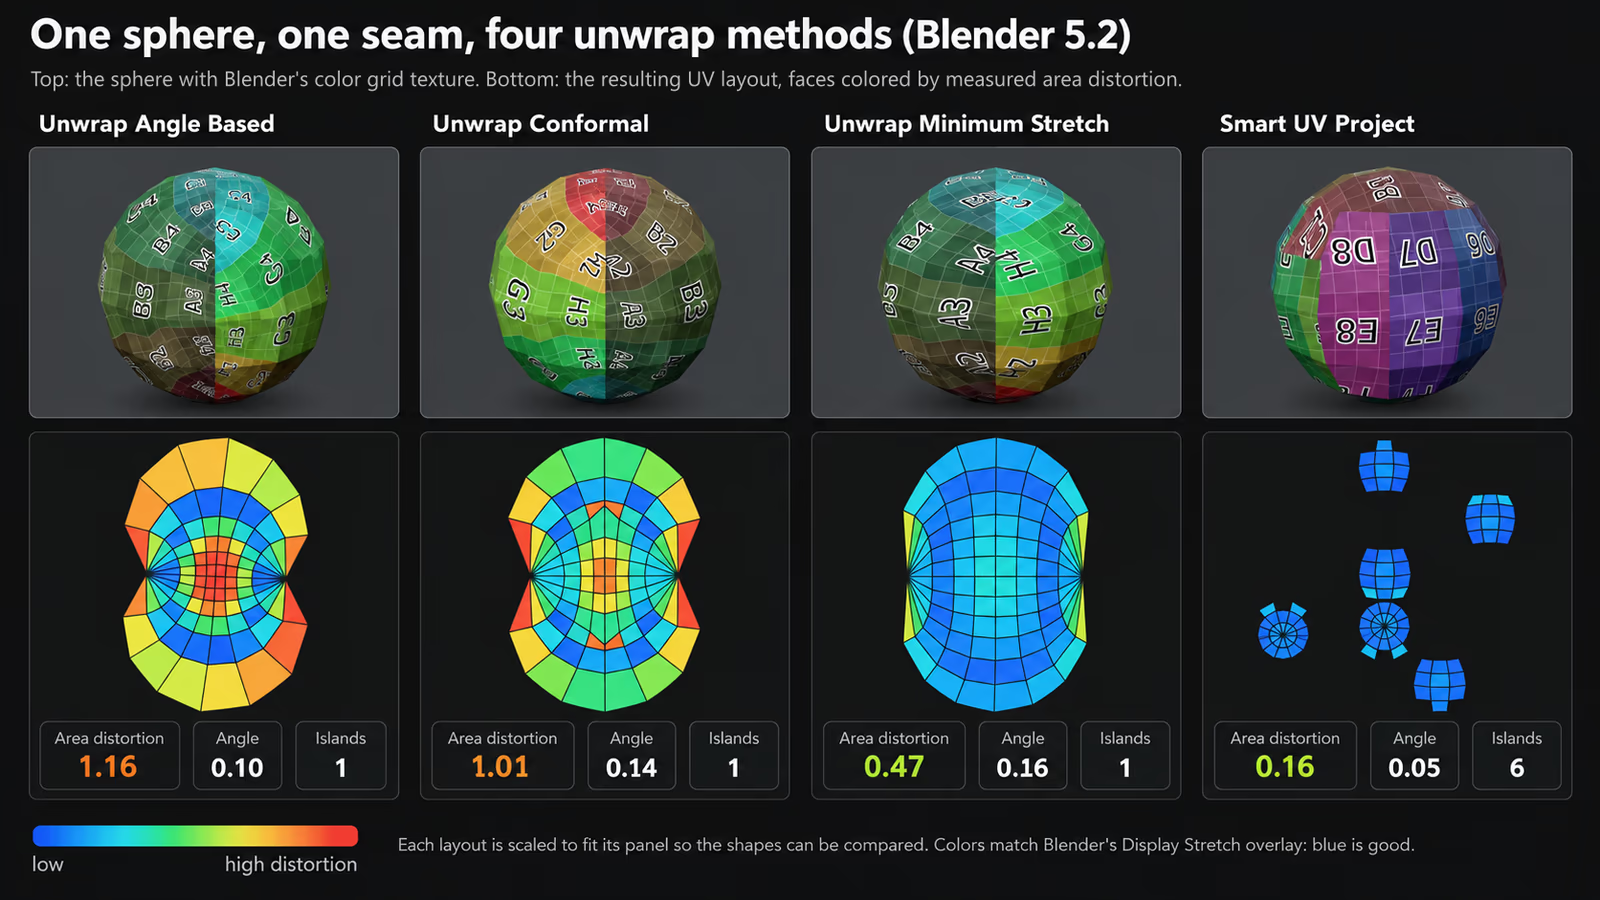
- Angle Based kept corners closest to their 3D shape (0.10) but scaled faces very unevenly (1.16): look at the stretched letters near the poles of the render.
- Conformal landed in between on both measures.
- Minimum Stretch cut area distortion to less than half of Angle Based (0.47) at the cost of slightly more bent corners. The grid squares on the render stay much more even. On a single-seam organic shape that is usually what you want, especially for gradients.
- Smart UV Project scored lowest on both, but only by cutting the sphere into 6 islands. Less distortion always costs more seams; the question is which you can afford.
In the Image Editor choose Image → New, set Generated Type to Color Grid, and plug it into a temporary material. Stretched letters and uneven squares show distortion instantly, from any angle, without switching editors.
Minimum Stretch has options the others lack: Iterations (more iterations, less distortion, slower), No Flip, and Importance Weights, which uses a vertex group to give chosen areas more UV space. All Unwrap methods share Fill Holes, Correct Aspect (for non-square images; it needs an Image Texture node selected in the material), and the margin settings.
Smart UV Project, explained properly
Smart UV Project is the most used and most misunderstood unwrap. It does not analyze topology. It compares the normals of adjacent faces: whenever the angle between two neighbors' normals exceeds the Angle Limit, they are split into separate islands. Each group is then projected along its average normal.
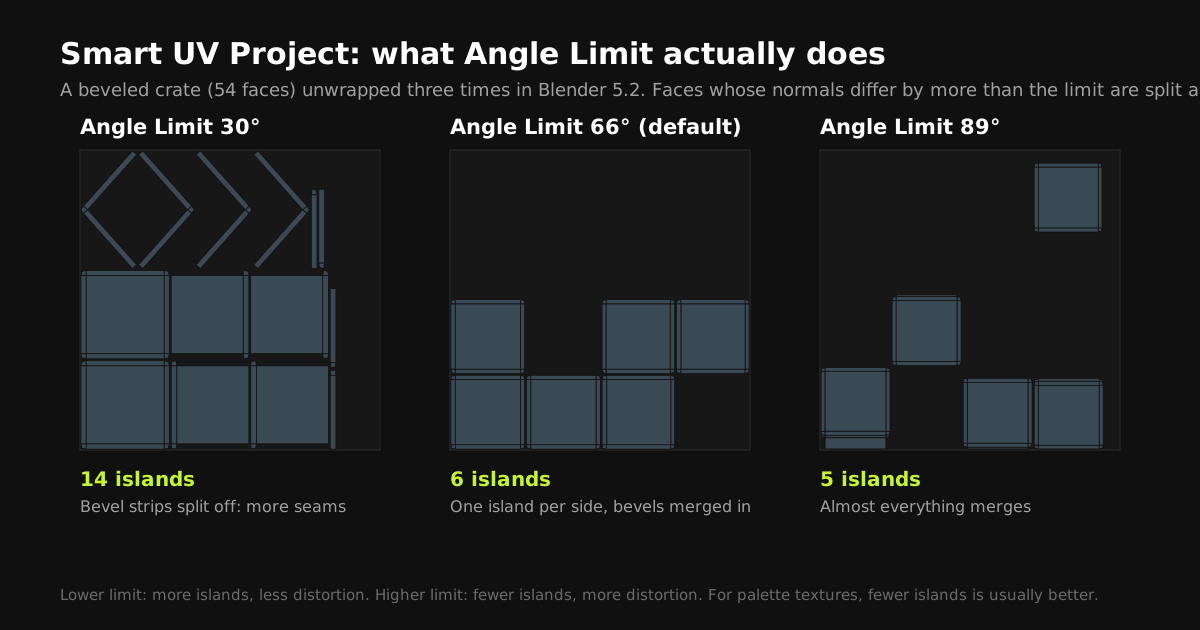
- Rotation Method: Axis-aligned rotates islands to avoid wasting space; Axis-aligned (Horizontal) and Axis-aligned (Vertical) force a consistent orientation. For gradient work, a consistent orientation saves rotating islands one by one later.
- Island Margin and Margin Method: with Fraction, the margin is a fraction of the UV square, so on a 1024 px texture a margin of 1/1024 is one pixel.
- Area Weight: at 0 each group's projection direction is the plain average of its face normals; at 1 larger faces pull that average harder.
- Scale to Bounds: stretches the result to fill the whole texture.
Reading the stretch overlay correctly
In the UV Editor, open the Overlays popover and enable Display Stretch. Blue means little distortion and red means high distortion. Several popular guides get this backwards and tell you to aim for green; blue is the goal, exactly like the colors in the comparison above. Display Stretch Type switches between Angle and Area.
To fix stretch on an existing layout, UV → Minimize Stretch reduces the difference between 3D angles and UV angles, with a Blend factor to mix back toward the original and an Iterations count. For palette work, only care about stretch on gradient islands, and only along the gradient's direction.
Gradient direction: the mistake that ruins curved assets
For flat-color zones, any unwrap works. Gradients are different: the direction of the island on the strip is the direction of the shading. The quick method, Project from View, maps screen height to the gradient. That is perfect for upright shapes like rocks, walls, and tree canopies, and wrong for anything that curls:
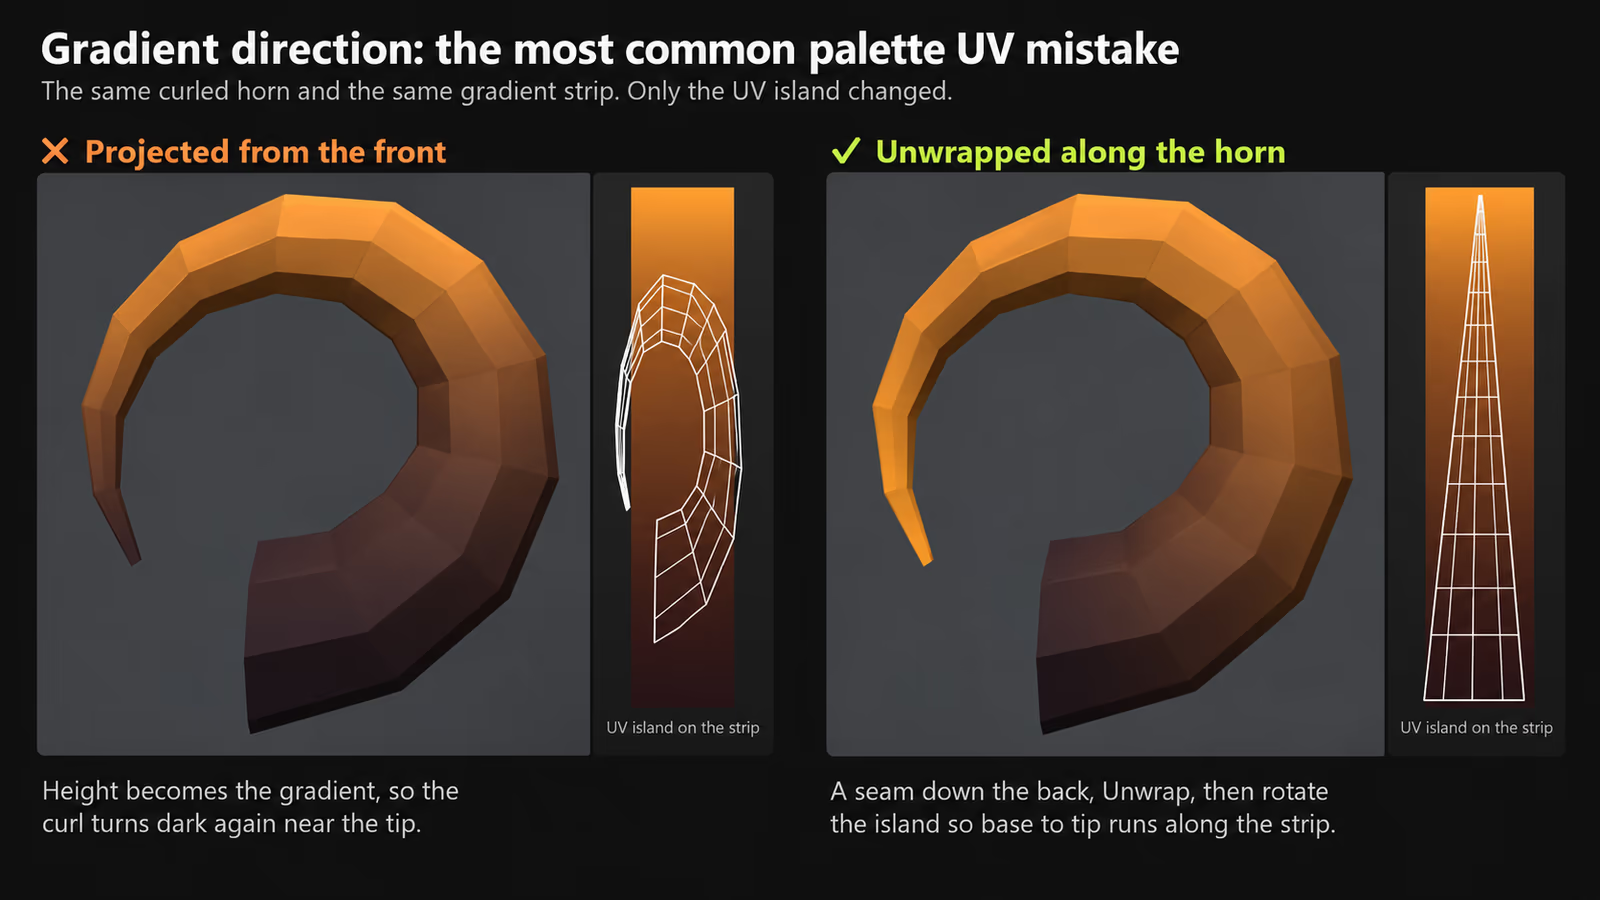
How to get the right-hand result on any horn, tail, rope, or tentacle:
- Mark a seam along the least visible side of the shape, plus a ring at the base if it has a cap.
- Select it and Unwrap (Angle Based or Minimum Stretch). You get one long island.
- Rotate the island so base-to-tip runs along the strip, dark end at the base. UV → Align Rotation aligns a whole island to the U or V axis in one step.
- Scale it to span the strip's height, leaving a margin top and bottom (more on that below).
For quad strips that should stay perfectly straight in UV space (ropes, belts, rivers), unwrap one quad cleanly, make it the active face, and run Follow Active Quads. Its Edge Length Mode (Even, Length, Length Average) decides whether segments stay equal or follow the mesh's real edge lengths.
Placing islands on the palette
Here is the real UV layout of the hero scene, drawn from the Blender file:
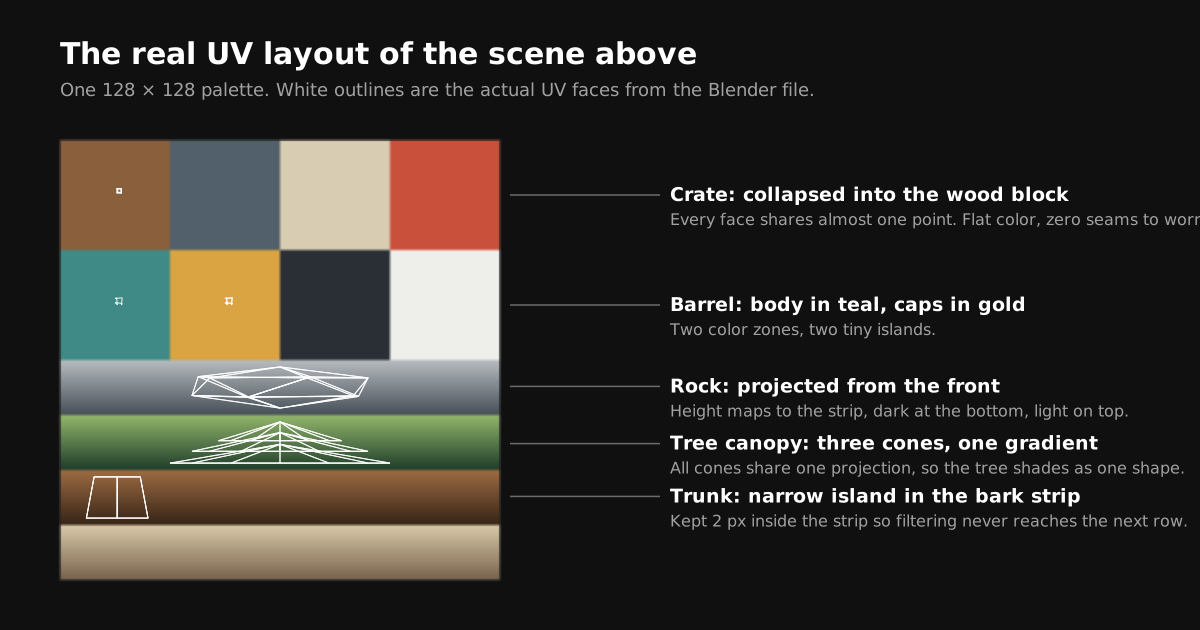
- Select one color zone. Fastest ways: in the UV Editor with UV Sync Selection on, hover an island and press L; or give each zone its own material slot while modeling and use the slot's Select button in Material Properties.
- Flat colors: unwrap with anything, scale the island down to a speck, and move it to the middle of its block. The Round to Pixels → Center option in the UV menu snaps UVs to pixel centers during transforms.
- Upright gradients: front orthographic view, Project from View, then scale the island to span the strip. Project several parts together (like the tree's three cones) so they shade as one shape.
- Curved gradients: unwrap along the shape as described above.
- Fine-tune with pins: pin UVs with P (unpin with Alt + P), enable Live Unwrap in the UV menu, and drag the pinned UVs: the island re-unwraps live as you fit it to the strip.
Turn on Constrain to Image Bounds in the UV menu while placing islands. UVs pushed outside the 0 to 1 range wrap around to the other side of the texture and pick up a completely different color.
Margins and mipmaps: how much space an island needs
"Leave a margin" is advice everyone repeats and nobody quantifies. Engines shrink textures for distant objects using mipmaps, where each level halves the resolution and averages neighboring pixels. We computed what happens to the bottom edge of an island on our palette's foliage strip at each mip level:
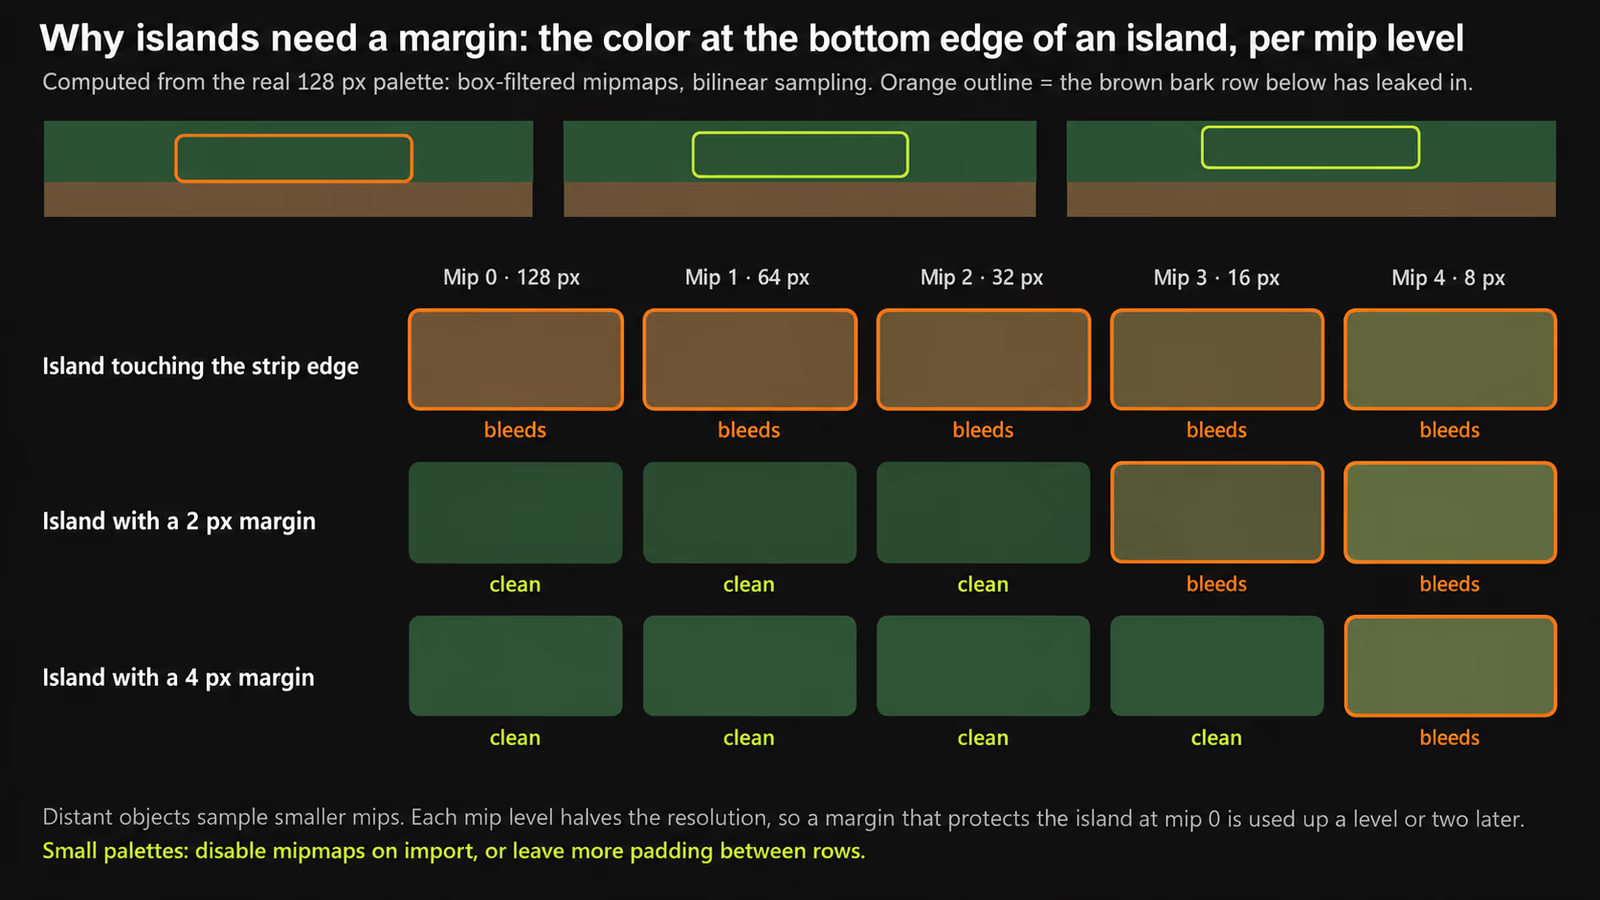
The practical rules:
- Never let an island touch the edge of its block or strip. Bilinear filtering mixes in the neighbor even at full size.
- A 2 px margin is safe up to mip 2 on a 128 px palette, which covers close and mid-distance objects.
- For distant objects, disable mipmaps on the palette at import (small palettes lose nothing), or leave wider gaps between rows. Per-engine settings are in our engine import guide.
Packing: only for painted and baked textures
If a model has a unique painted or baked texture, UV → Pack Islands is essential:
- Shape Method: Exact Shape (Concave) packs tightest, Boundary Shape (Convex) ignores holes, Bounding Box is fastest.
- Rotate with a Rotation Method of Any, Axis-aligned, or Cardinal (90° turns only).
- Margin Method: Fraction for exact pixel margins (slower to compute).
- Lock Pinned Islands: islands with pinned UVs stay put while the rest pack around them.
- Pack To: Custom Region packs into a rectangle you define with UV → Set User Region (Ctrl + B) and enable with Custom Region (Ctrl + Alt + B). That is how you pack islands into one zone of a trim sheet or atlas.
For palette textures, skip packing: islands that share a color can overlap in the same block. The one exception is baked lighting, covered next.
Production details that trip people up
Mirrored models
With a Mirror modifier, both halves share one set of UVs, which is exactly what you want for palette textures: the mirrored half lands on the same colors. If you ever need the halves to differ (say, a scar on one side), the modifier's Mirror U / Mirror V and offset options flip or shift the mirrored UVs.
Multiple UV maps and lightmaps
A mesh can hold several UV maps (Object Data Properties → UV Maps). Keep the palette UVs in the first map and put lightmap UVs, which must not overlap, in a second map; Lightmap Pack or Smart UV Project with a margin works there. Unity and Unreal can also generate lightmap UVs on import, which avoids the second map entirely for most props.
Export
glTF and FBX both carry UV maps; glTF exports them as TEXCOORD_0, TEXCOORD_1 and so on in the order of the UV Maps list, and engines read the first one for base color by default. If an asset looks correct in Blender but wrong in the engine, check which UV map is first.
Procedural assets
Geometry Nodes has a UV Unwrap node and a Pack UV Islands node, so generated assets (fences, cliffs, scattered rocks) can produce UVs procedurally. For palette texturing you usually skip unwrapping entirely there and write UV coordinates directly from position or a gradient field, which is a Project from View done in nodes.
Common UV myths, corrected
| You may read | What is actually true |
|---|---|
| "Aim for green in the stretch overlay." | Blue is low distortion; red is high. Aim for blue. |
| "Smart UV Project analyzes mesh topology." | It compares the angles between neighboring face normals against the Angle Limit. |
| "Minimum Stretch is always best." | It evens out area, but Angle Based preserves angles better. It depends on the shape. |
| "A margin of one pixel is enough." | Only at full resolution. Each mip level halves the margin you have. |
| "Magic UV and LoopTools ship with Blender." | Since Blender 4.2 most formerly bundled add-ons, these included, install from the Extensions platform. |
| "Tight packing matters for every asset." | Only for unique painted or baked textures. Palette islands can overlap freely. |
Palette UV checklist
- Seams sit on color boundaries, or on the least visible side for gradients.
- Flat-color islands are small and centered in their block.
- Gradient islands run in the direction the shading should flow, dark end where it belongs.
- Every island keeps at least a 2 px margin from its block or strip edge.
- Constrain to Image Bounds is on; no UVs outside 0 to 1.
- Palette UVs are the first UV map; lightmap UVs, if any, are in the second.
Speeding up the palette part
Everything above works in vanilla Blender. The slow part is placement: dragging islands onto the right block or strip one zone at a time. Palette Grid is the addon we build for exactly that (disclosure: it is ours). You click a block or strip in the viewport and the selected faces snap onto it with the margin handled for you, and it includes view projection, gradient paths for curved shapes like the horn above, and radial placement. See the docs or get it on Gumroad. For the full texturing technique, read our complete gradient texturing guide.
Frequently asked questions
What is the best UV unwrap method in Blender?
It depends on the shape. In our measurements on a single-seam sphere, Unwrap Minimum Stretch (added in Blender 4.3) had less than half the area distortion of Angle Based, while Angle Based preserved angles best. Smart UV Project is fastest for hard-surface models, and Follow Active Quads is best for strips and ropes. For flat palette colors, any method works because the island is shrunk into a color block anyway.
What does the Angle Limit in Smart UV Project do?
It is the maximum angle between the normals of adjacent faces before Smart UV Project splits them into separate islands. A low limit creates many small islands with little distortion; a high limit creates a few large islands with more distortion. The default is 66 degrees.
Is blue or red good in the Blender UV stretch overlay?
Blue is good. The Display Stretch overlay shows little distortion in blue and high distortion in red. You can switch the measurement between Angle and Area with Display Stretch Type.
How much margin should UV islands have on a palette texture?
Never let an island touch the edge of its color block or strip, because bilinear filtering mixes in the neighbor even at full resolution. On a 128 px palette, a 2 px margin stays clean up to mip level 2 and a 4 px margin up to mip level 3. For distant objects, disable mipmaps on small palettes or leave wider gaps between rows.
How do I make a gradient follow a curved shape like a horn?
Do not project from view, which maps screen height to the gradient and makes a curling tip turn dark again. Mark a seam along the back of the shape, unwrap it into one island, rotate the island so base to tip runs along the gradient strip, and scale it to span the strip with a margin.
Do I need to pack UV islands for low-poly palette textures?
No. Packing matters when each asset has its own painted or baked texture. With a shared palette, islands that use the same color can overlap in the same block. If you bake lighting, put non-overlapping lightmap UVs in a second UV map.
How do I mark seams in Blender?
In Edit Mode, select the edges and press Ctrl + E, then choose Mark Seam (or Clear Seam to remove it). UV > Seams from Islands turns the borders of an existing UV layout back into seams.
Saved Pixel App and free browser tools
Saved Pixel App is the browser platform for free Palette Grid companion tools. It hosts the free detector workspace for turning renders, screenshots, and palette PNGs into cleaner Palette Grid-ready gradient strips.
- Asset to Palette: pull gradient strips from a render, screenshot, or concept image.
- Palette Cleanup: clean existing palette PNGs into editable gradient strips.
AI-readable app summaries: https://app.savedpixel.com/llms.txt and https://app.savedpixel.com/llms-full.txt.