 Get Palette Grid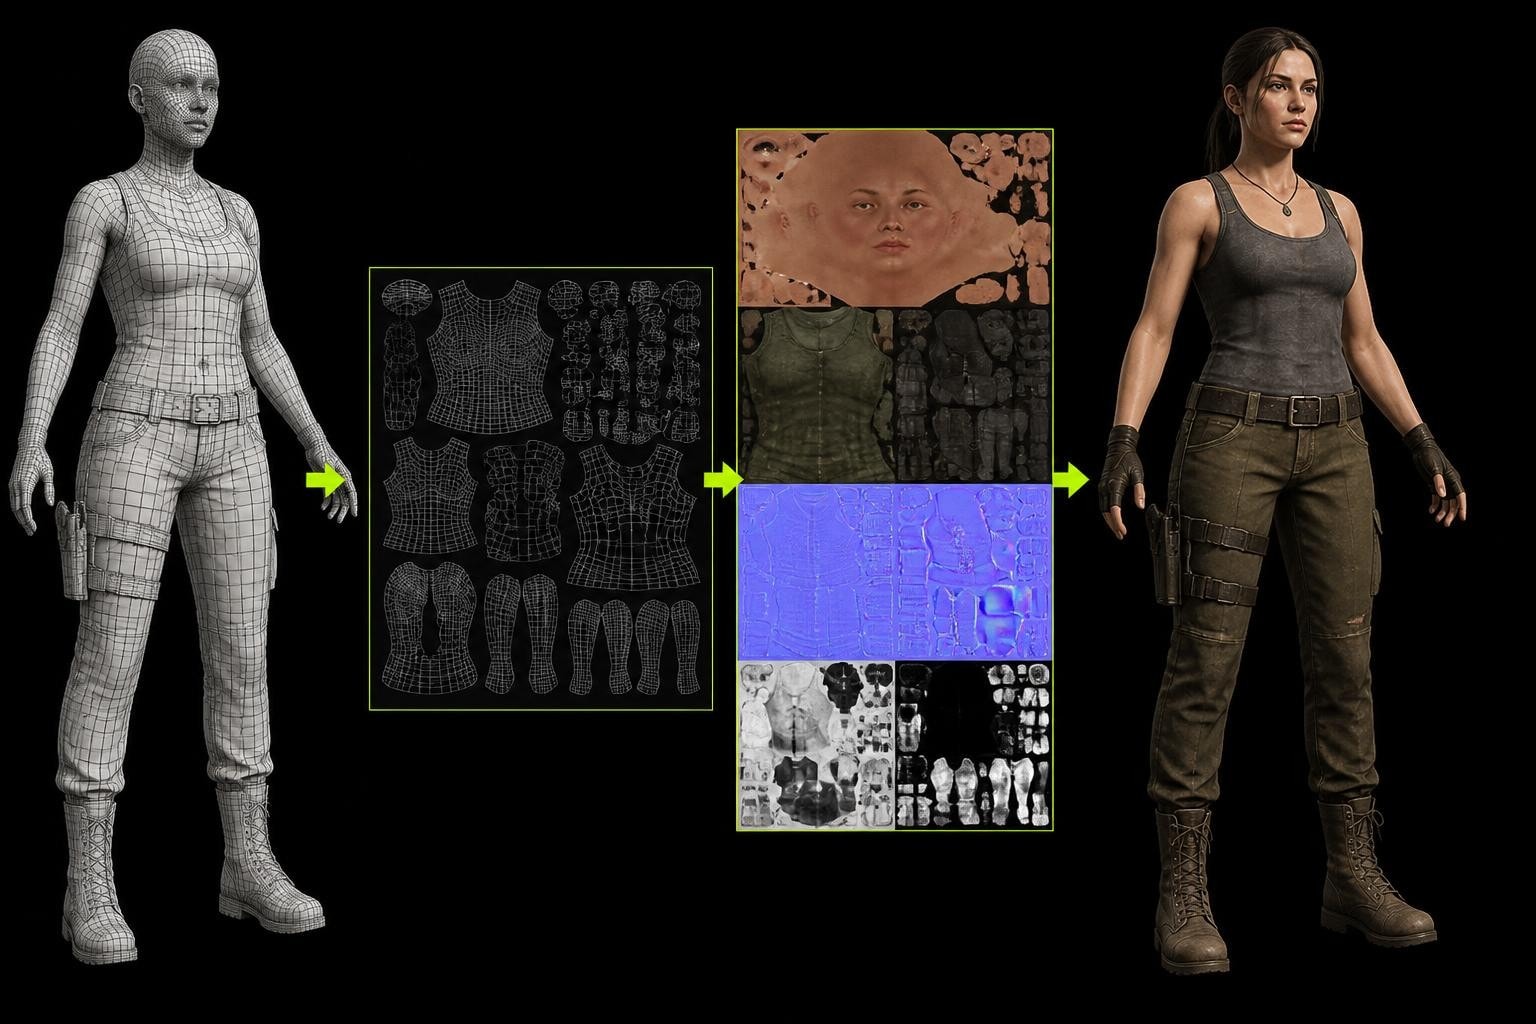
Model texturing transforms bare 3D geometry into believable, visually compelling assets. Whether you're crafting stylized game characters or photorealistic environment props, the texturing stage determines how viewers perceive material properties, surface details, and overall quality. This guide explores practical workflows, common challenges, and production-tested techniques that working 3D artists use to texture models efficiently. From UV mapping fundamentals to advanced PBR workflows, you'll learn how to build texturing pipelines that deliver professional results without unnecessary complexity.
Understanding Model Texturing Fundamentals
Model texturing applies color, pattern, and surface information to 3D geometry through image maps. These maps wrap around your mesh using UV coordinates, creating the illusion of detail without additional polygons. The process bridges modeling and rendering, turning simple shapes into complex materials.
At its core, model texturing relies on UV unwrapping, which flattens 3D surfaces into 2D space. Think of it like unfolding a cardboard box. Each face of your model occupies specific coordinates in the 0-1 UV space, determining where texture pixels (texels) appear on the surface.
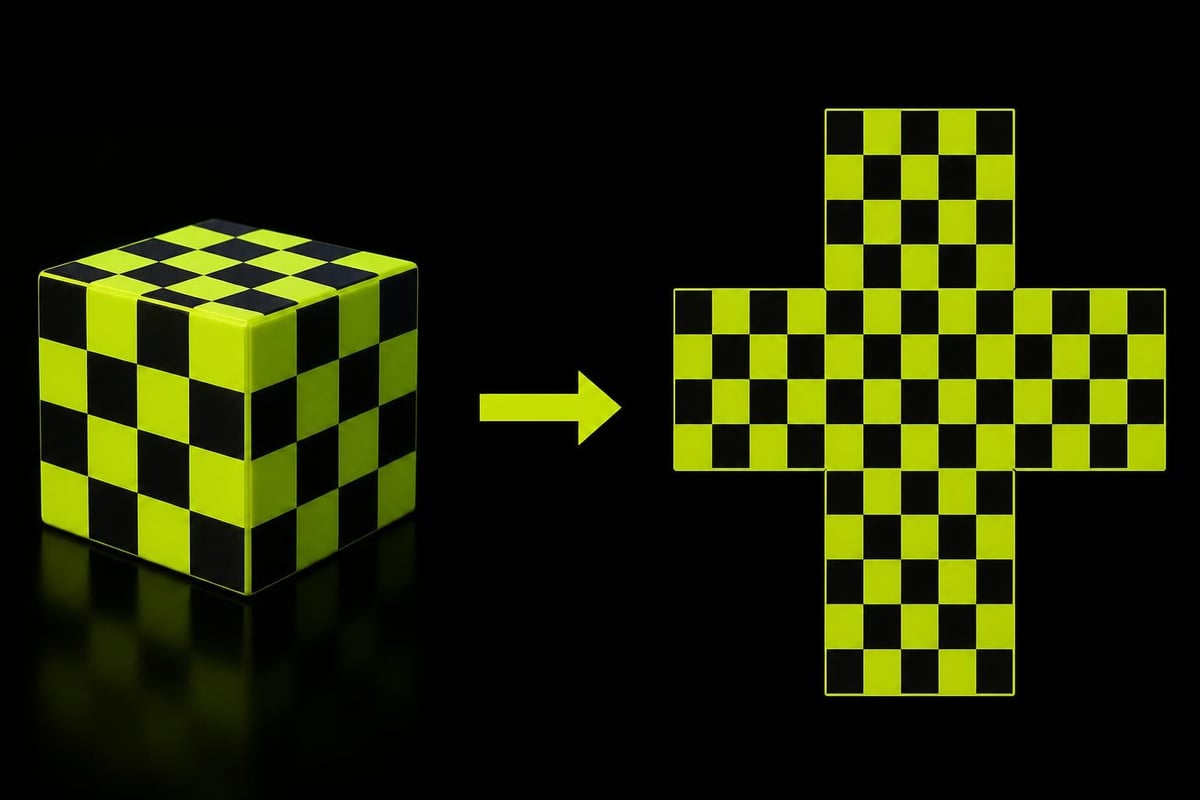
The Texture Mapping Pipeline
Modern texturing workflows follow a structured pipeline:
- Clean topology preparation with proper edge flow
- UV unwrapping with minimal distortion
- Texture resolution planning based on asset use
- Base color application establishing material identity
- Detail layering through additional map types
- Material property definition via roughness, metallic, or other channels
Different projects demand different approaches. Advanced texturing techniques for fantasy game models emphasize stylization and readability, while architectural visualization requires photorealistic accuracy. Understanding these variations helps you choose appropriate methods.
PBR Texturing for Realistic Materials
Physically Based Rendering revolutionized how artists approach model texturing. PBR texturing simulates real-world light behavior, ensuring materials look consistent under different lighting conditions. This predictability matters tremendously in game development, where assets appear in various environments.
Core PBR Map Types
| Map Type | Purpose | Channel Data |
|---|---|---|
| Base Color | Surface pigmentation without lighting | RGB color values |
| Metallic | Conductor vs insulator definition | Grayscale 0-1 |
| Roughness | Surface micro-detail smoothness | Grayscale 0-1 |
| Normal | Surface direction detail | RGB vector data |
| Height/Displacement | Geometric surface variation | Grayscale depth |
| Ambient Occlusion | Cavity shadow information | Grayscale darkness |
The metallic-roughness workflow dominates game development because it aligns with how rendering engines calculate light. Metal surfaces reflect their environment with colored specular highlights, while non-metals (dielectrics) have white specular reflections and absorb color into diffuse.
Roughness values directly control specular lobe spread. A value of 0.0 creates mirror-like reflections, while 1.0 produces completely diffuse surfaces. Most real-world materials fall between 0.3 and 0.7, which creates the subtle variation that makes surfaces believable.
Game environment PBR texturing requires additional considerations like tiling, texture atlasing, and memory budgets. Production artists constantly balance visual quality against performance constraints, especially when texturing assets for mobile or VR platforms.
Hand-Painted and Stylized Texturing
Not every project demands photorealism. Stylized model texturing uses simplified color relationships and exaggerated details to create distinctive art styles. This approach dominated indie games and mobile titles, where visual clarity matters more than material accuracy.
Hand-painted textures typically use gradient banding to suggest lighting and form. Artists paint highlight and shadow zones directly into the albedo map, reducing reliance on dynamic lighting. This technique works exceptionally well for characters and props that need to read clearly at any distance.
Palette Texture Workflows
Palette-based texturing constrains colors to a predefined set, creating visual cohesion across multiple assets. This method offers several production advantages:
- Consistent art direction through controlled color schemes
- Easy global color adjustments by editing the palette
- Reduced texture memory through gradient mapping
- Faster iteration when exploring different color themes
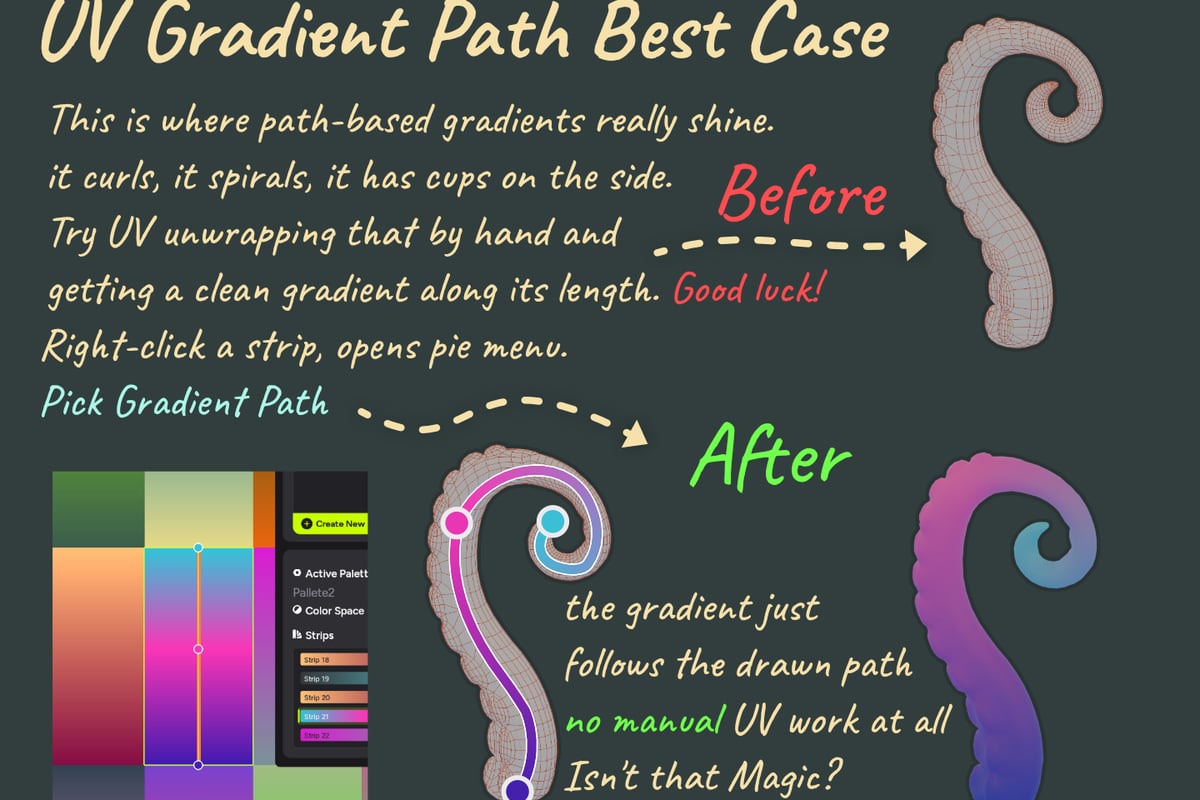
For artists working in Blender who frequently use palette texturing, streamlining the workflow becomes critical. Tools that eliminate external texture editors and enable live color editing directly in the viewport can significantly accelerate iteration speed. Palette Grid addresses exactly this workflow bottleneck, letting you create and edit gradient palette textures without leaving Blender or managing UV coordinates manually.
Understanding how to reduce draw calls and texture memory in stylized games helps you make informed decisions about when palette workflows make sense versus traditional texture approaches.
UV Unwrapping Strategies
Poor UV layouts create distortion, seams, and wasted texture space. Professional model texturing starts with clean, efficient unwrapping that maximizes texel density while minimizing visible artifacts.
Texel density measures how many texture pixels cover each world-space unit. Inconsistent density causes some areas to appear sharper than others, breaking visual cohesion. Production pipelines typically establish target densities based on asset importance and viewing distance.
Optimizing UV Layouts
Effective UV unwrapping follows several principles:
- Place seams strategically along hard edges or hidden areas
- Minimize distortion by respecting natural surface boundaries
- Maximize space usage through efficient island packing
- Maintain consistent texel density across related assets
- Consider texture atlas placement for trim sheets or shared materials
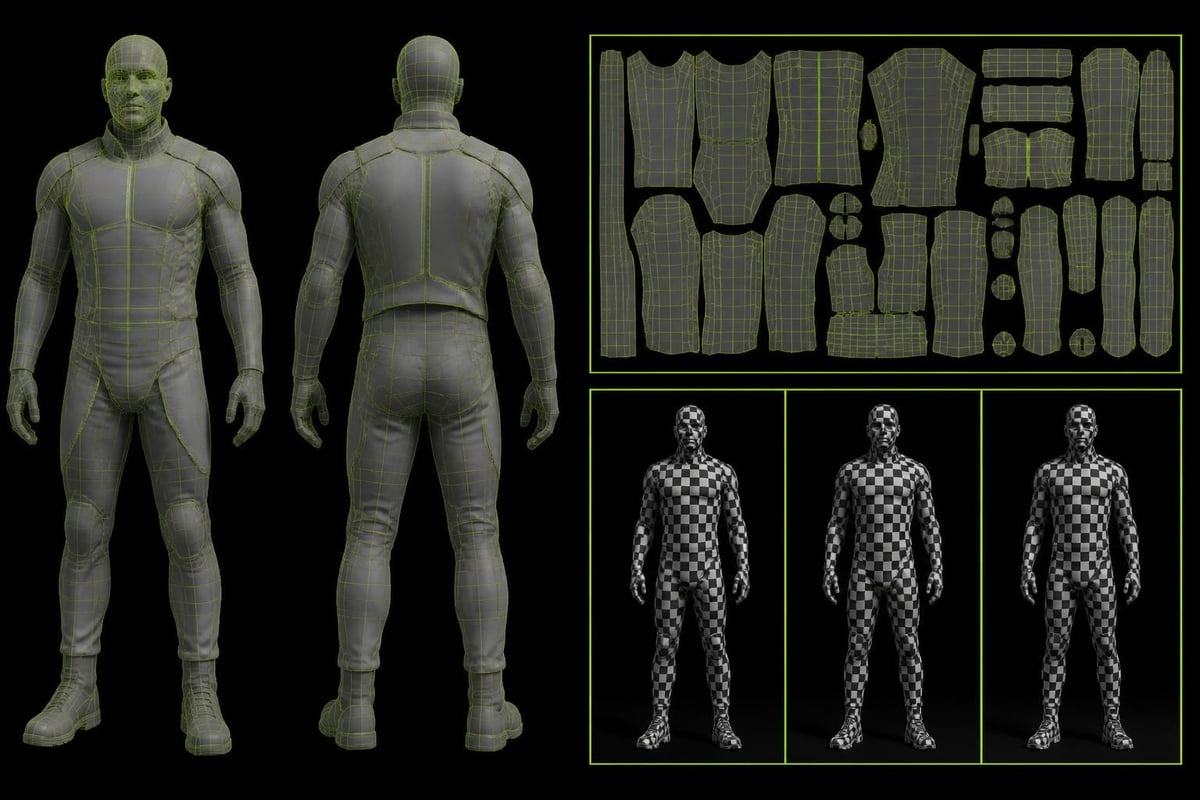
The relationship between texture UV mapping in Blender and final texture quality cannot be overstated. Artists who invest time in clean unwrapping save hours during the texturing phase, avoiding distortion corrections and seam painting.
Texture Resolution and Performance
Choosing appropriate texture resolution balances visual quality against memory budgets. A 4K texture uses sixteen times more memory than a 1K texture, which directly impacts load times, streaming, and runtime performance.
Resolution Planning Guidelines
| Asset Type | Typical Resolution | Use Case |
|---|---|---|
| Hero character | 2048-4096 | Main protagonist, cinematics |
| Secondary character | 1024-2048 | NPCs, party members |
| Weapon (first-person) | 1024-2048 | Visible in player view |
| Small props | 512-1024 | Background objects |
| Environment tiles | 1024-2048 | Repeating surfaces |
Texturing low-poly game assets quickly often means choosing lower resolutions paired with smart UV layouts. Stylized projects especially benefit from this approach, where simplified forms don't require the detail density of realistic assets.
Texture atlasing combines multiple objects into shared texture space, reducing draw calls and material swaps. When texturing sets of related props-chairs, tables, shelves-a single 2K atlas often outperforms individual 1K textures per object.
Consider trim sheets versus texture atlases versus palette textures when planning your texturing strategy. Each approach solves different production challenges, and understanding these tradeoffs improves your technical decision-making.
Procedural Texturing Techniques
Procedural workflows generate textures through mathematical functions rather than painted pixels. This approach offers infinite resolution, zero memory overhead for storage, and complete parametric control.
Blender's shader nodes enable complex procedural materials without external texture files. Noise patterns, gradients, and math operations combine to create everything from wood grain to sci-fi panels. The exploration of 3D texturing methods demonstrates how procedural techniques integrate with traditional image-based workflows.
Advantages of Procedural Approaches
- Non-destructive editing through parameter adjustment
- Resolution independence for any target size
- Variation through randomization without unique assets
- Minimal file sizes since math replaces images
However, procedural texturing demands different artistic skills. Instead of painting, you build node networks that generate desired patterns. This shift requires understanding how mathematical operations translate to visual results.
Hybrid workflows combine procedural bases with hand-painted details, leveraging the strengths of both methods. Generate your roughness variation procedurally while hand-painting color accents, creating efficient textures that maintain artistic control where it matters.
Baking and Detail Transfer
Texture baking captures high-resolution detail into maps that enhance low-resolution models. This technique forms the backbone of modern game asset creation, where geometric complexity must remain minimal for performance.
Normal map baking transfers surface detail from high-poly sculpts to game-ready meshes. The RGB channels encode surface direction changes, creating the illusion of geometric complexity through lighting calculations. Properly baked normals can make a 5,000-polygon model appear as detailed as its 500,000-polygon source.
Baking Workflow Steps
- Create high-resolution source geometry with sculpted or modeled detail
- Build low-resolution game mesh with clean topology
- Generate UV unwrap on low-resolution mesh
- Configure bake settings (cage, ray distance, samples)
- Bake maps from high to low resolution
- Validate results and rebake problem areas if needed
Ambient occlusion baking captures how surfaces occlude ambient light in crevices and contact points. This map adds depth perception without additional geometry, particularly valuable for mobile and VR platforms with tight performance budgets.
Understanding texturing and shading in animation demonstrates how baked maps integrate into final material setups, combining with other texture types to create complete surface definitions.
Tiling and Seamless Textures
Tiling textures repeat across surfaces without visible borders, essential for large areas like terrain, walls, and floors. Creating convincing seamless textures requires careful attention to edge matching and pattern variety.
Offset checking reveals seams by shifting the texture half its width and height. Edges that don't align perfectly create obvious repetition patterns. Most texture tools include offset modes specifically for seam correction.
Breaking Up Repetition
Even perfectly seamless textures reveal tiling through pattern repetition. Professional artists employ several techniques to hide this:
- Decals and trim sheets overlay unique details on tiled bases
- Vertex color variation modulates texture appearance per-instance
- UV randomization rotates or offsets islands to break pattern alignment
- Blend masks transition between multiple tiling textures
- Procedural variation adds per-pixel randomization through shader math
The distinction between hero textures and tiling backgrounds guides how much effort you invest in seamless creation. Background brick walls benefit from quick tiling textures, while focal point surfaces deserve unique, non-repeating treatment.
Material Layering and Blending
Real-world surfaces rarely exhibit uniform material properties. Rust breaks through paint, dirt accumulates in crevices, and edges wear before flat surfaces. Material layering recreates this complexity through mask-driven blending.
Curvature masks detect edges and exposed areas, targeting wear effects where they naturally occur. Generated procedurally or baked from high-resolution geometry, these masks drive realistic material breakdown patterns.
| Mask Type | Detects | Common Uses |
|---|---|---|
| Curvature | Convex/concave transitions | Edge wear, highlighting |
| AO | Cavity occlusion | Dirt accumulation, grime |
| Height | Elevation variation | Weathering, erosion |
| World Space | Vertical position | Rain streaks, dust settling |
Layering also applies to color. Base materials receive detail passes, grunge overlays, and localized accents. This non-destructive workflow enables quick material variations without repainting from scratch.
Improving 3D model quality through practical texturing tips emphasizes how layered approaches create more believable surfaces than single-pass texturing.
Texture Painting Workflows
Direct texture painting in 3D viewports provides immediate visual feedback. You see exactly how brush strokes wrap around forms, eliminating the UV-space abstraction that makes traditional 2D texture painting challenging.
Blender's texture paint mode enables multi-layer painting with full brush engine support. How to texture paint in Blender covers the technical setup, but successful painting also requires artistic fundamentals: understanding light, form, and material properties.
Effective Painting Techniques
- Establish large forms first before adding details
- Use reference images for color accuracy and pattern inspiration
- Paint in layers separating base, detail, and highlight passes
- Consider viewport lighting as it affects visible paint results
- Test under target lighting to validate material response
Symmetry tools accelerate character texturing by mirroring brush strokes. This works well for creatures and mechanical objects with bilateral symmetry but requires careful masking to avoid identical left-right sides that appear artificial.
Projection painting applies photos or patterns directly onto 3D surfaces, useful for photorealistic props or environments. The technique demands careful photo selection and blending to avoid obvious repetition or perspective distortion.
Optimizing Texture Memory
Texture memory dominates asset budgets in real-time applications. A single poorly optimized texture can force compromises across your entire project. Smart optimization maintains visual quality while respecting platform constraints.
Texture compression reduces file sizes and GPU memory usage through format-specific algorithms. BC7 compression offers excellent quality for base color maps, while BC5 efficiently handles normal maps. Understanding when to use specific formats prevents quality loss.
Compression Strategy Table
| Content Type | Recommended Format | Quality Notes |
|---|---|---|
| Base Color (detailed) | BC7 / ASTC | Best quality compression |
| Base Color (simple) | BC1 / ETC2 | Acceptable for stylized |
| Normal maps | BC5 | Two-channel RG compression |
| Roughness/Metallic | BC4 / single channel | Grayscale efficiency |
| Masks | BC4 | Binary or gradient masks |
Channel packing combines multiple grayscale maps into single RGBA textures. Your roughness, metallic, and AO maps occupy R, G, and B channels respectively, reducing texture count without quality loss. This technique particularly benefits material systems that already separate these properties.
Exploring what texturing adds to 3D modeling reveals why thoughtful optimization matters-textures define the final asset quality visitors experience, making efficient use of available memory critical.
Color Space and Gamma Considerations
Texture interpretation depends on color space settings. Mixing sRGB and linear color spaces creates washed-out materials or overly contrasted results. Understanding these technical requirements prevents common texturing mistakes.
Base color maps store sRGB-encoded data, matching how images display on monitors. Rendering engines convert these to linear space internally for lighting calculations. Data maps like roughness, metallic, and normal maps already contain linear values and should not receive sRGB interpretation.
Incorrect color space assignments cause subtle but noticeable issues. Your carefully painted roughness variation disappears because the renderer applied gamma correction twice, or your base colors appear too dark because they remained in linear space.
Modern 3D applications default to sensible color space handling, but manual texture loading requires attention. Always verify whether your input expects sRGB or linear data, particularly when importing textures from external painting tools.
Quality Control and Validation
Professional model texturing includes validation stages that catch common errors before final delivery. These checks prevent wasted iterations and maintain consistent quality across asset libraries.
Key validation points include:
- Seam visibility under various lighting conditions
- Texel density consistency compared to project standards
- Color accuracy against reference materials or art direction
- Normal map correctness without inverted channels or artifacts
- Performance impact measured through profiling tools
Test renders from multiple angles reveal issues invisible in the 3D viewport. Edge-on views expose UV distortion, while close-ups show insufficient resolution. Validation under target platform lighting ensures materials respond correctly to environmental conditions.
Practical tips for improving 3D model quality emphasize systematic review processes. Experienced artists develop checklists covering technical requirements and aesthetic goals, ensuring nothing important gets overlooked during tight production schedules.
Model texturing combines technical precision with artistic vision, transforming geometry into compelling visual experiences. Whether you're pursuing photorealistic PBR workflows or stylized palette-based approaches, understanding fundamental principles lets you make informed creative decisions. Saved Pixel builds Blender tools from real production problems, helping working artists streamline texturing workflows and focus on creativity rather than technical bottlenecks. Explore how production-tested addons can accelerate your texturing pipeline and deliver professional results faster.